Cover image for Far Future Friday: Painting Crimson Fists, Part One

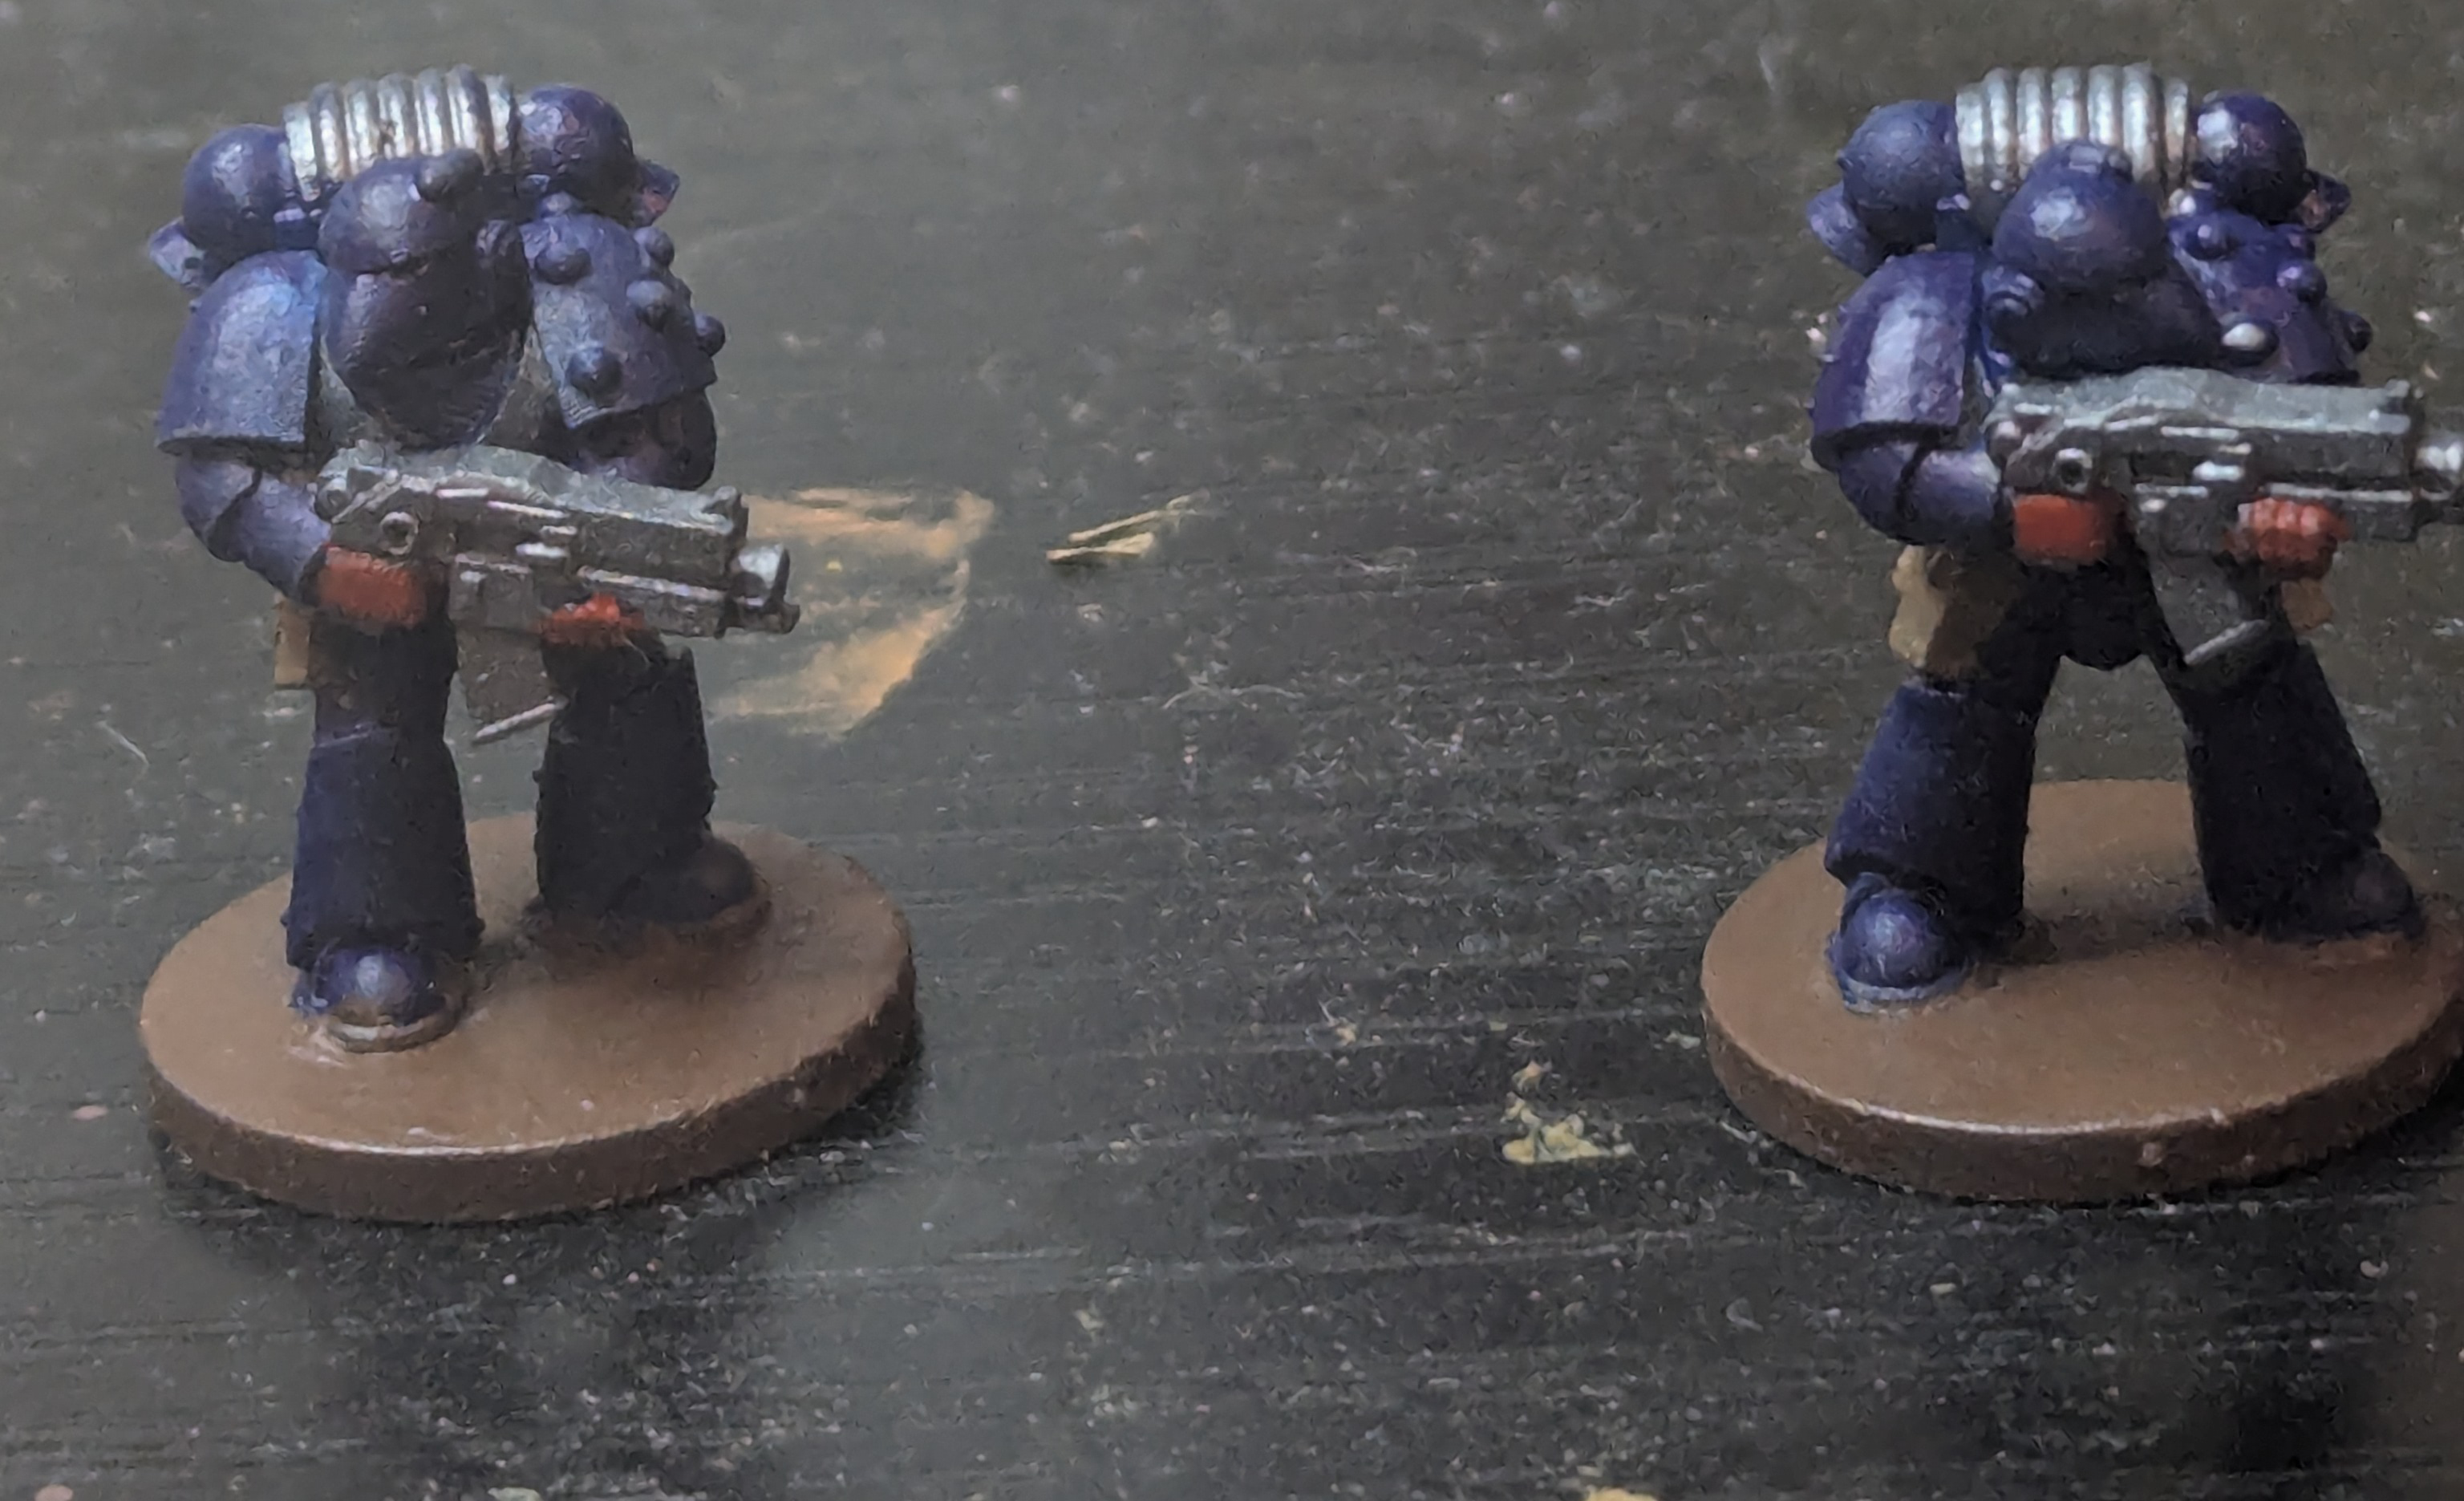
Welcome to Far Future Friday, where I take a crack at painting different sci-fi miniatures in 15mm - and show you how to, too! Today’s post centers on the Crimson Fists, 40k’s original poster boys, as seen on the cover of Rogue Trader and the third edition Space Marine codex. Although I never really picked a Chapter when I played 40k, I decided on Crimson Fists for this initial 15mm Friday because of the awesome sculpts of Pizzagrenadier. I’m using his Bad Ass Tyrant’s War Beakies (scaled up to 15mm) for all my Marines for when I play 15mm 40k.

The paints

When it comes to painting Crimson Fists, you’ll need only a handful of paints: a blue for the armor, a gunmetal to undercoat the bolter casing/magazine, and a red for that trademark crimson fist.

For the blue, we’re attempting match Games Workshop’s Kantor Blue. For this, I use Golden’s Pthalo Blue (Red Shade) from their High Flow Acrylics range as a more cost-effective option - a dropper bottle of Pthalo Blue is $14.75 USD for a 4oz/118mL bottle, while a pot of Kantor Blue is $4.55 USD for a 12mL pot.

You have a couple options for the gunmetal: I typically AK Interactive’s Gun Metal, but you could also use any other silver metallic (or even a dark warm grey like Pro Acryl’s aptly named Dark Warm Grey).

The crimson color can be anything from Army Painter’s Crimson Hand Red to a standard Alizarin Crimson from the acrylics aisle. I used Golden’s Napthol Red Light.

The process

Start from a grey primer. If I’m priming with a rattlecan, I use Colour Forge’s Standard Grey. If I’m using an airbrush to prime, I use Stynylrez’s standard grey primer.

Grey primed Crimson Fists miniatures

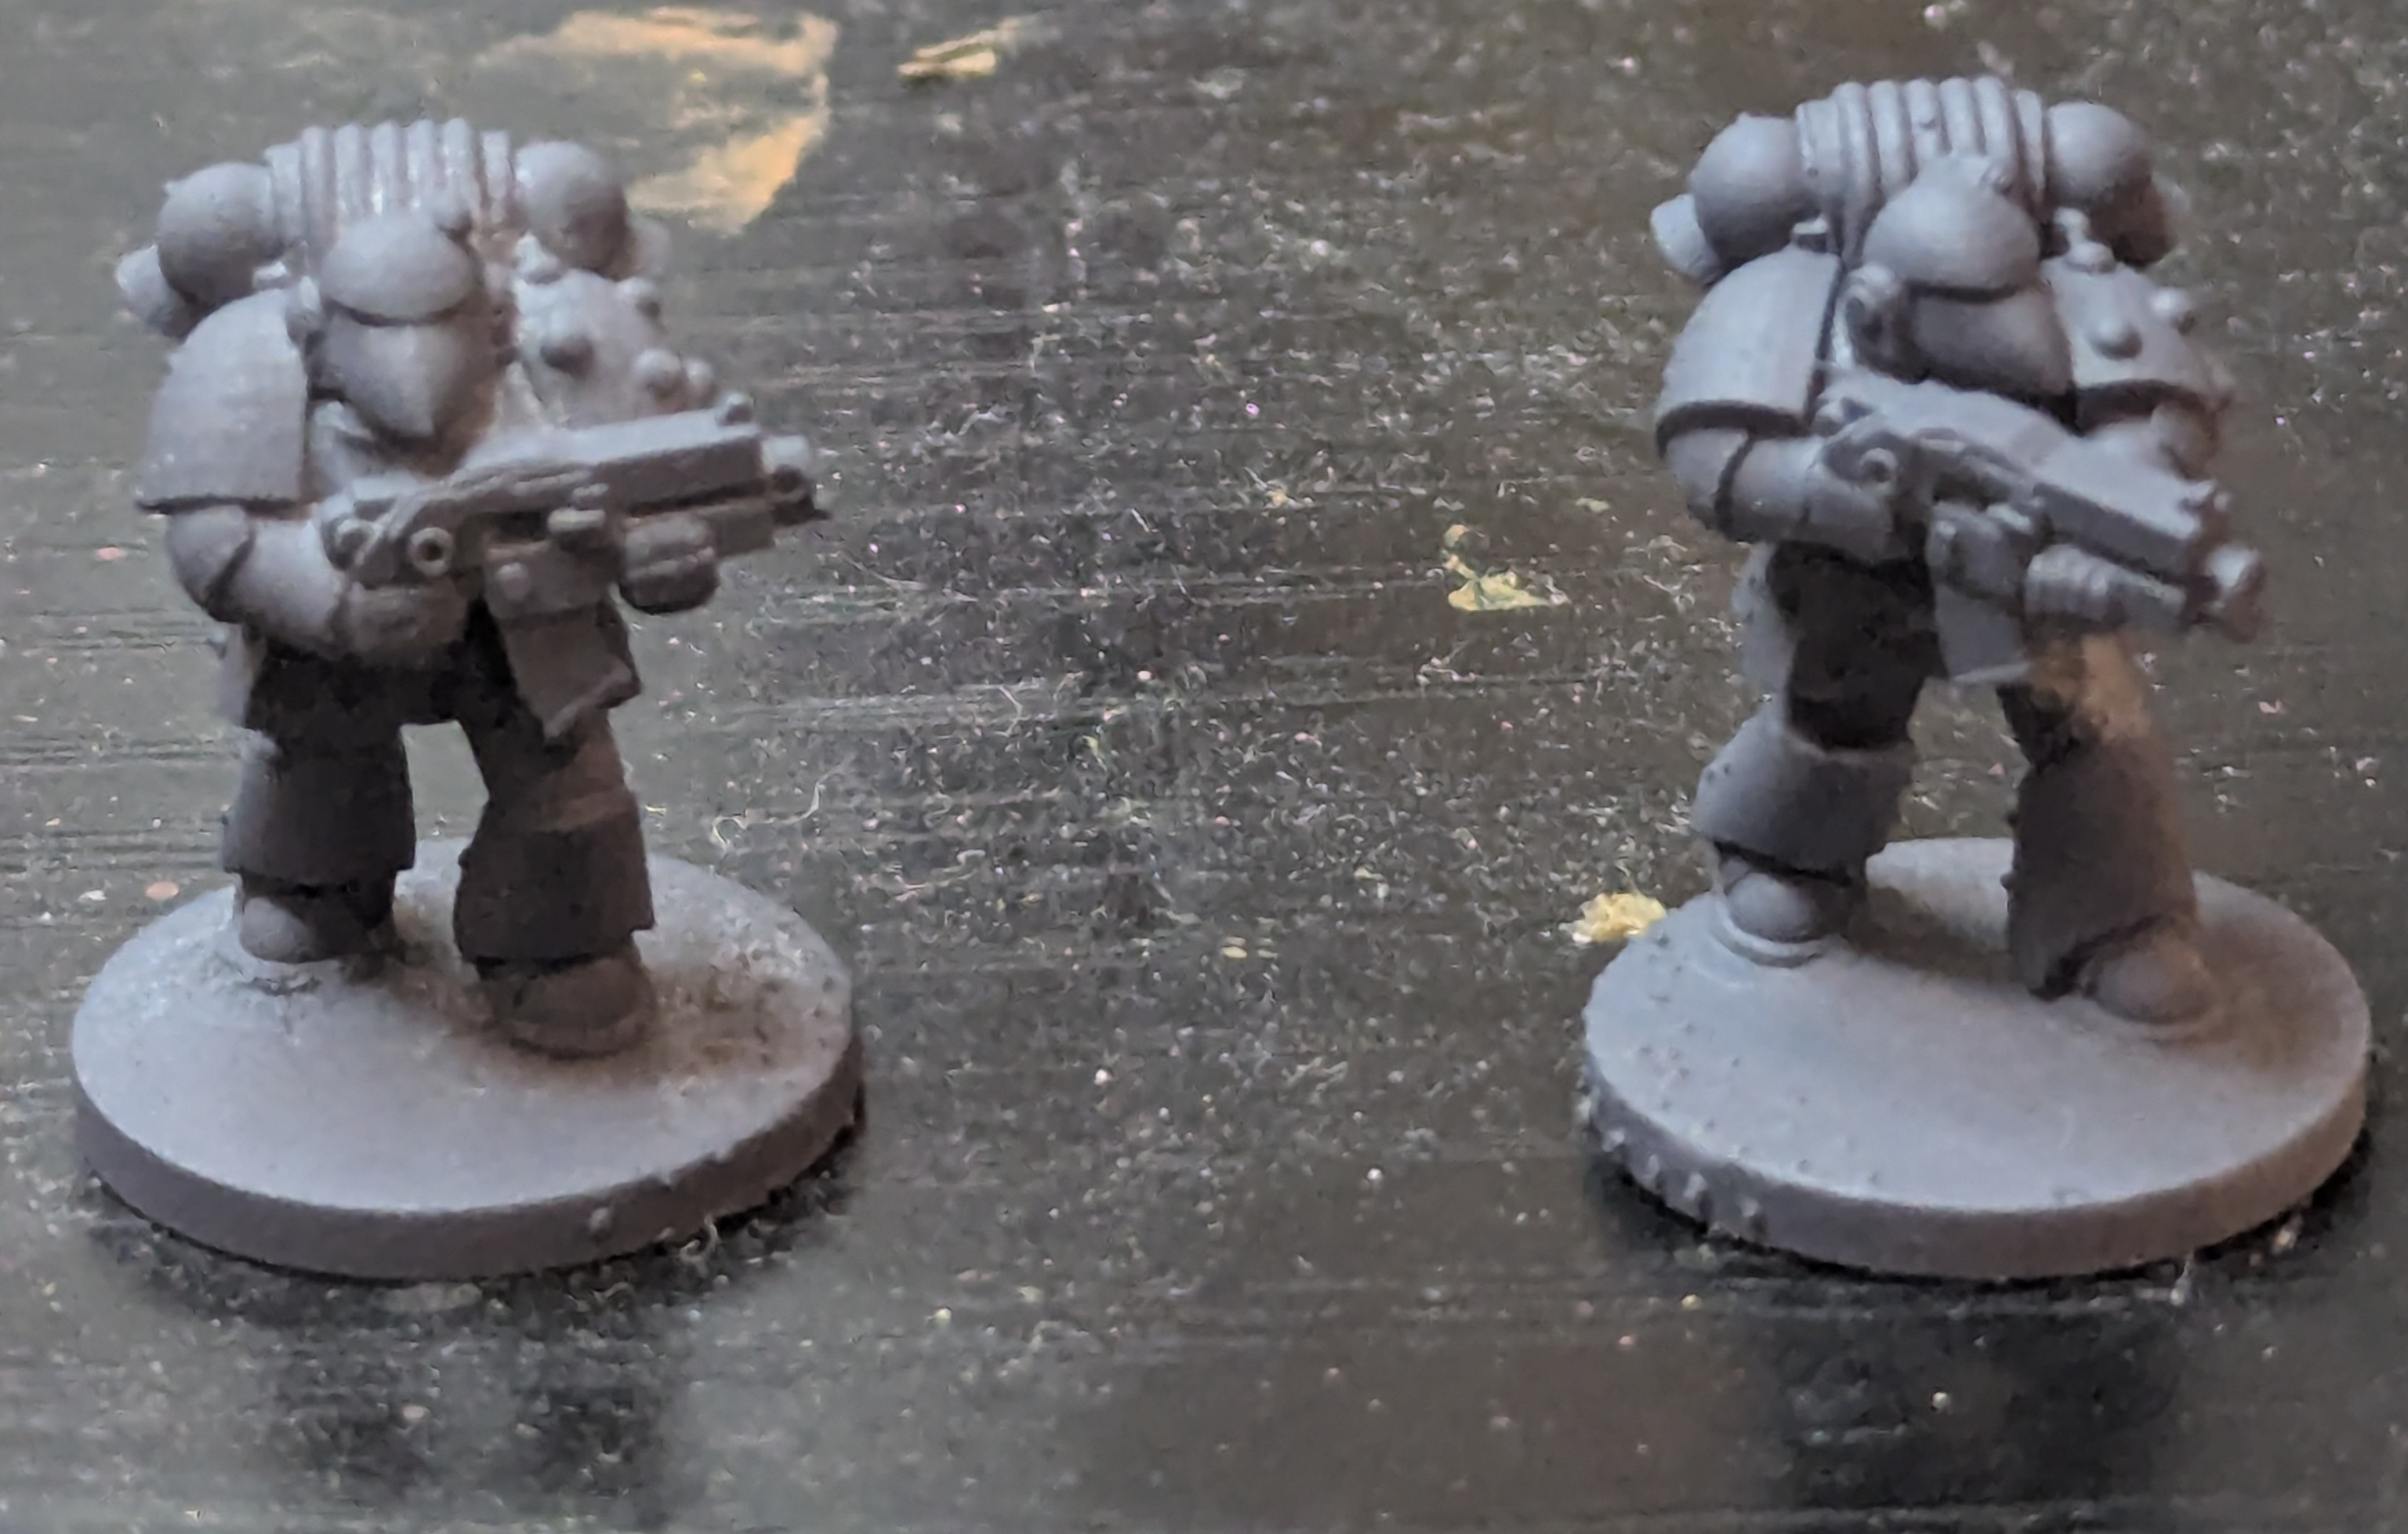
From there, basecoat the entire model with Pthalo Blue (Red Shade), except for the hands, pouches, grenades, bolter casing, and any visible cabling. Don’t worry too much if you get paint on any of the aforementioned areas - we’ll be going over them with other paints anyway. Especially don’t worry if you’re using an airbrush for this step, because you will get paint in areas that you don’t mean to.

Crimson Fists with blue basecoat applied

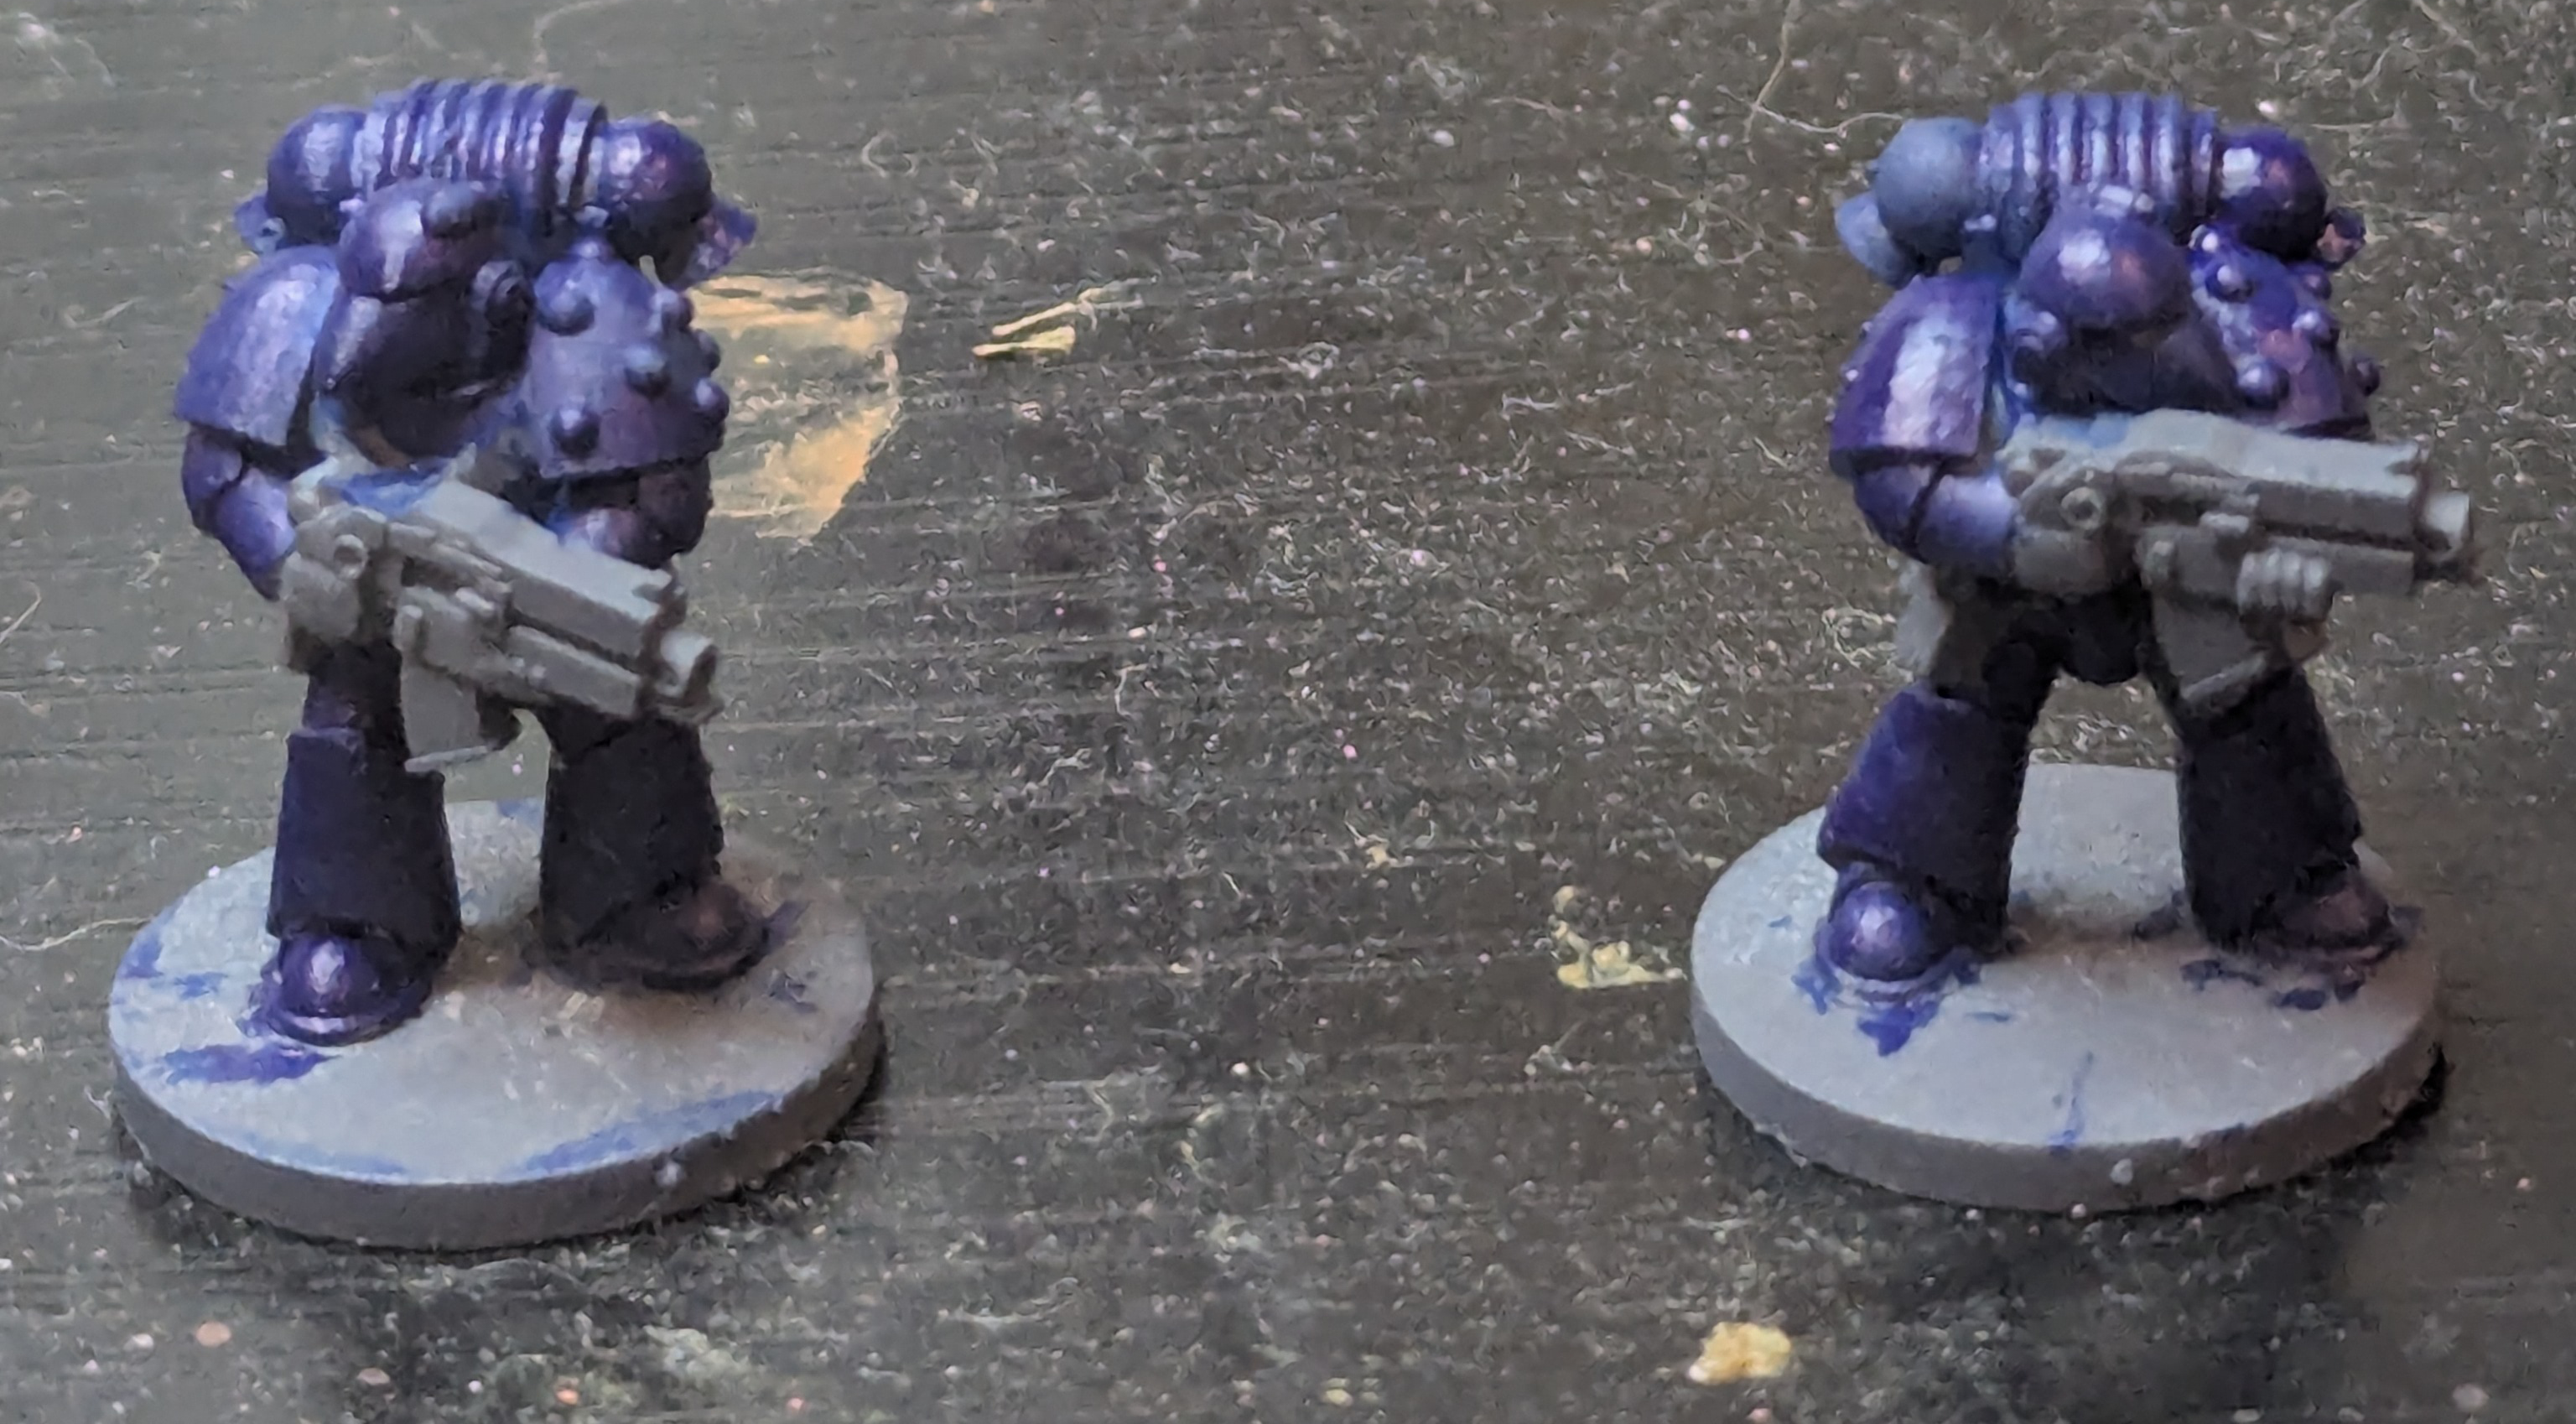
Paint the bolter case in your preferred gunmetal color. If you feel like being extra fancy, you can repaint over everything except the magazine, the ejection port and the little front divot in a warm grey color to simulate the fact that there’s a plastic/metal case overtop of the bolter’s innards.

Crimson Fists with gunmetal bolter casing

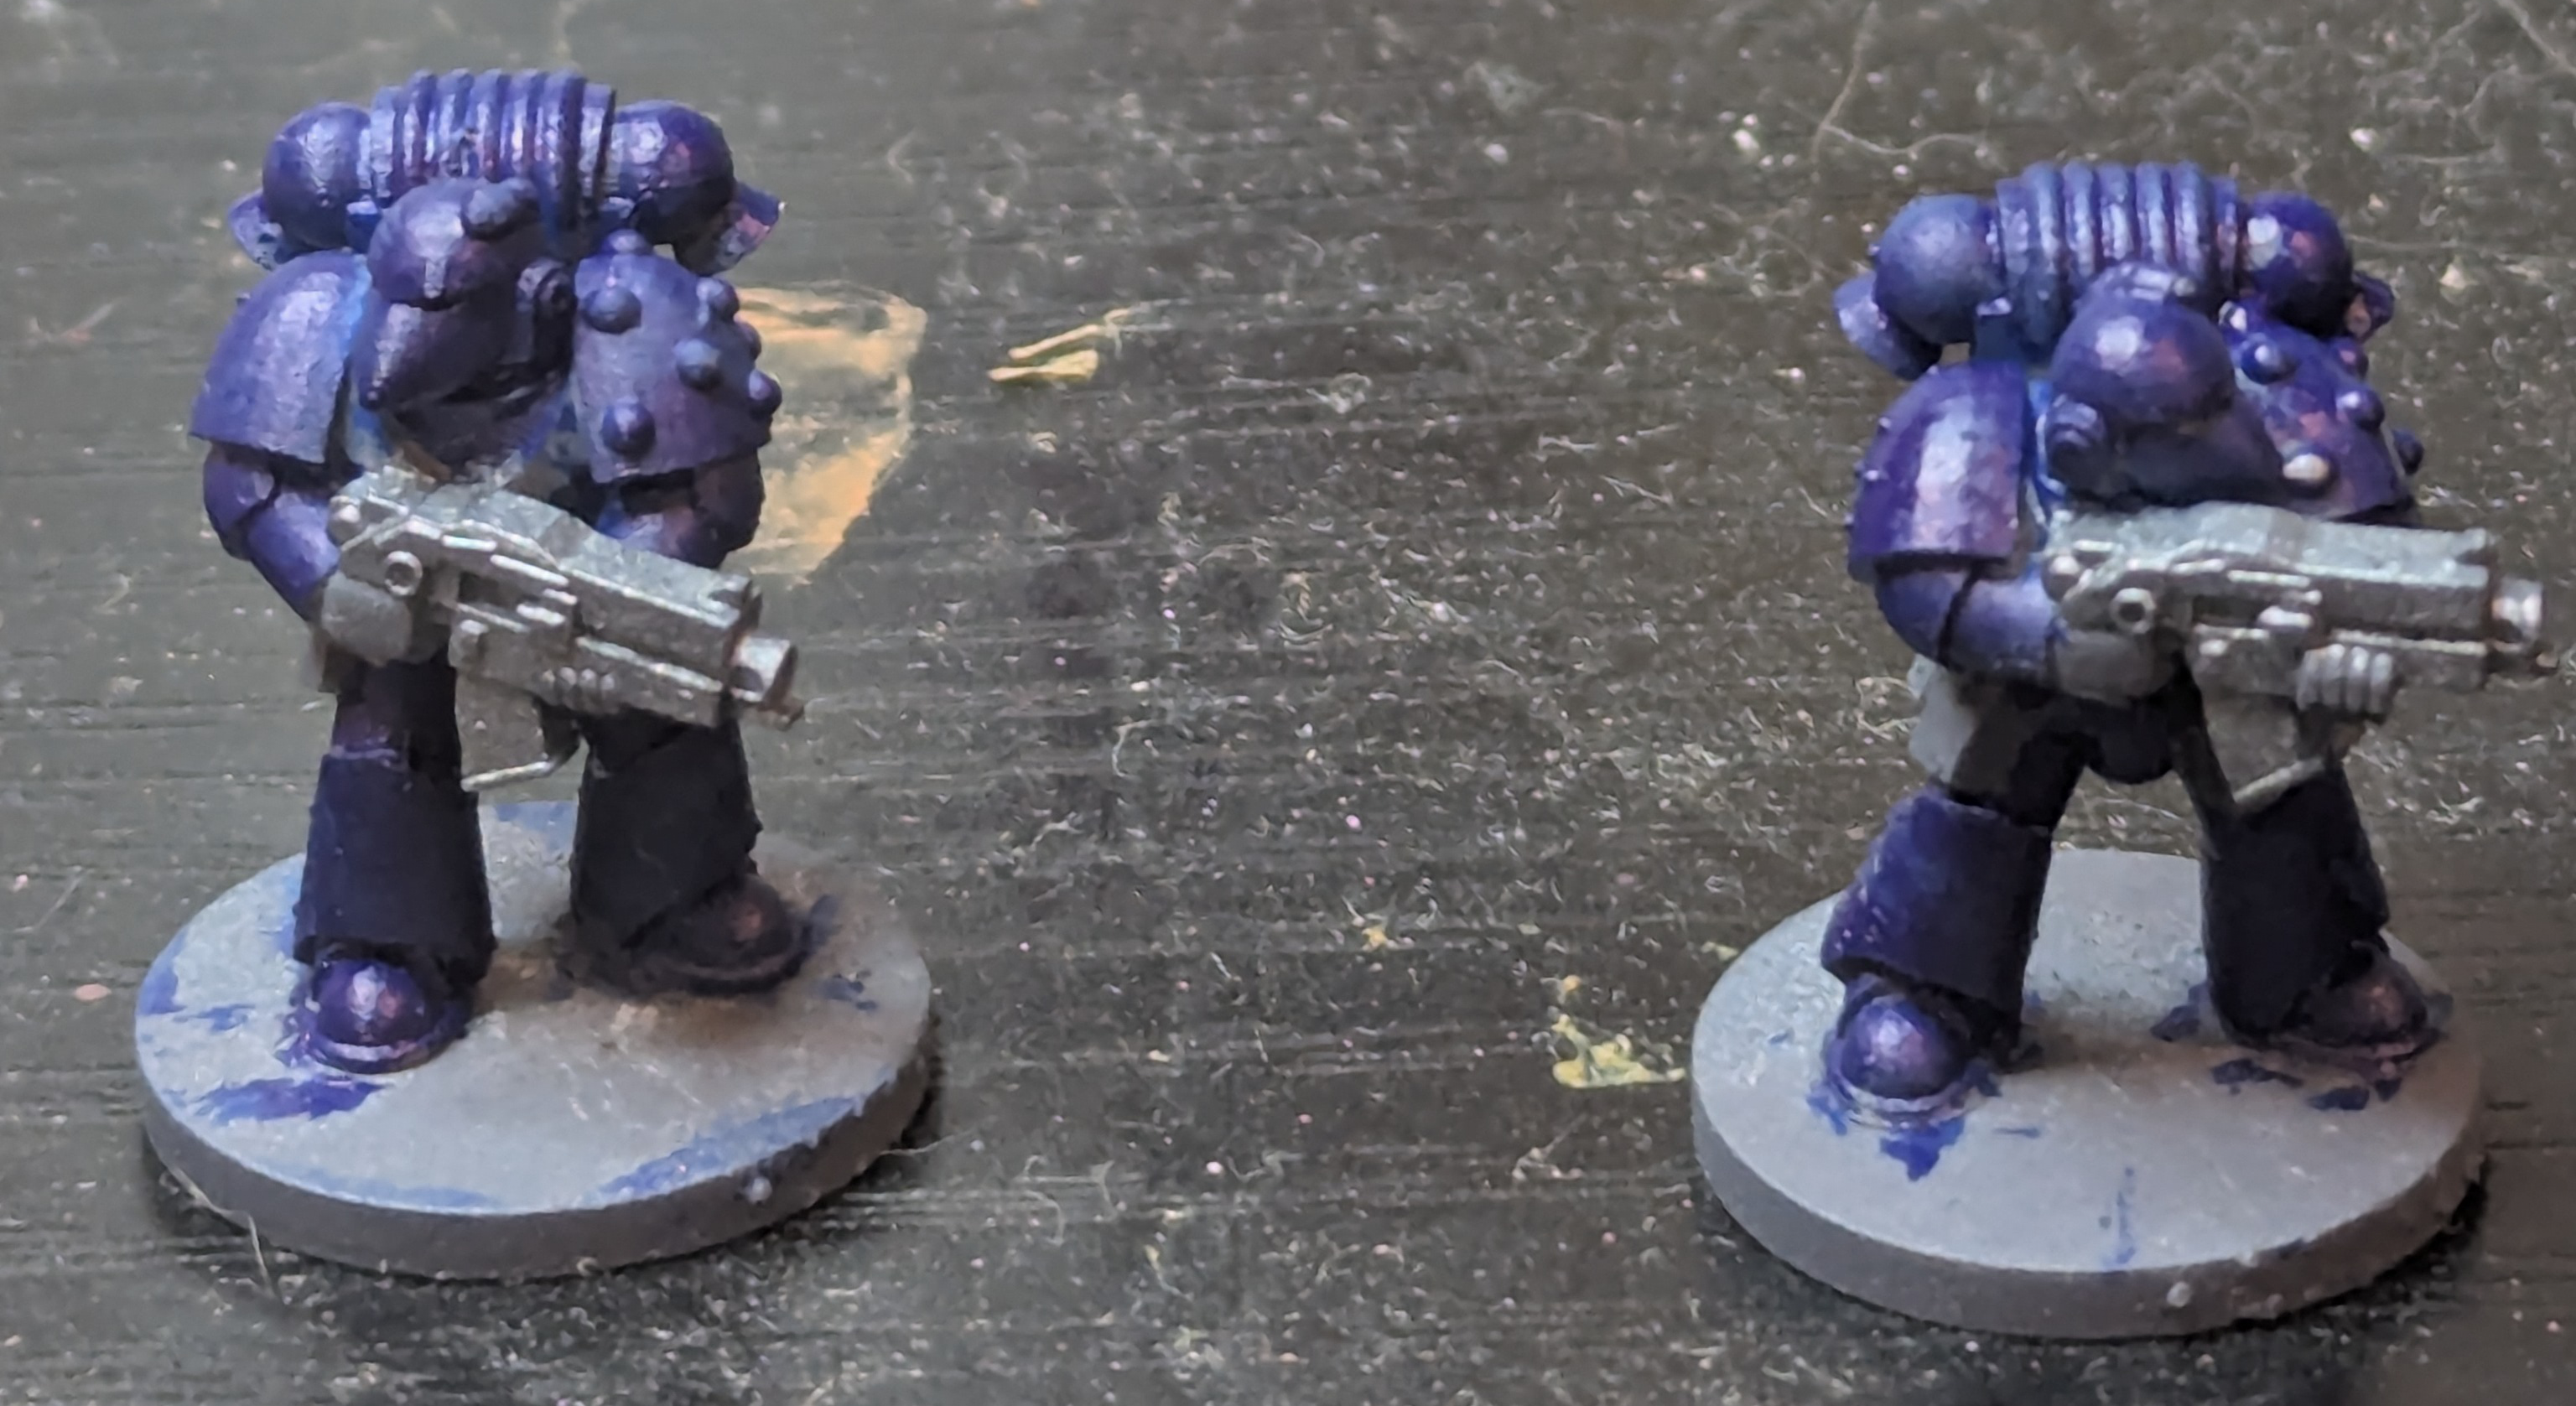
If you’re painting non-veteran Crimson Fists, paint only the left hand red. If you’re painting veterans, paint both hands red.

Crimson Fists with red hands painted

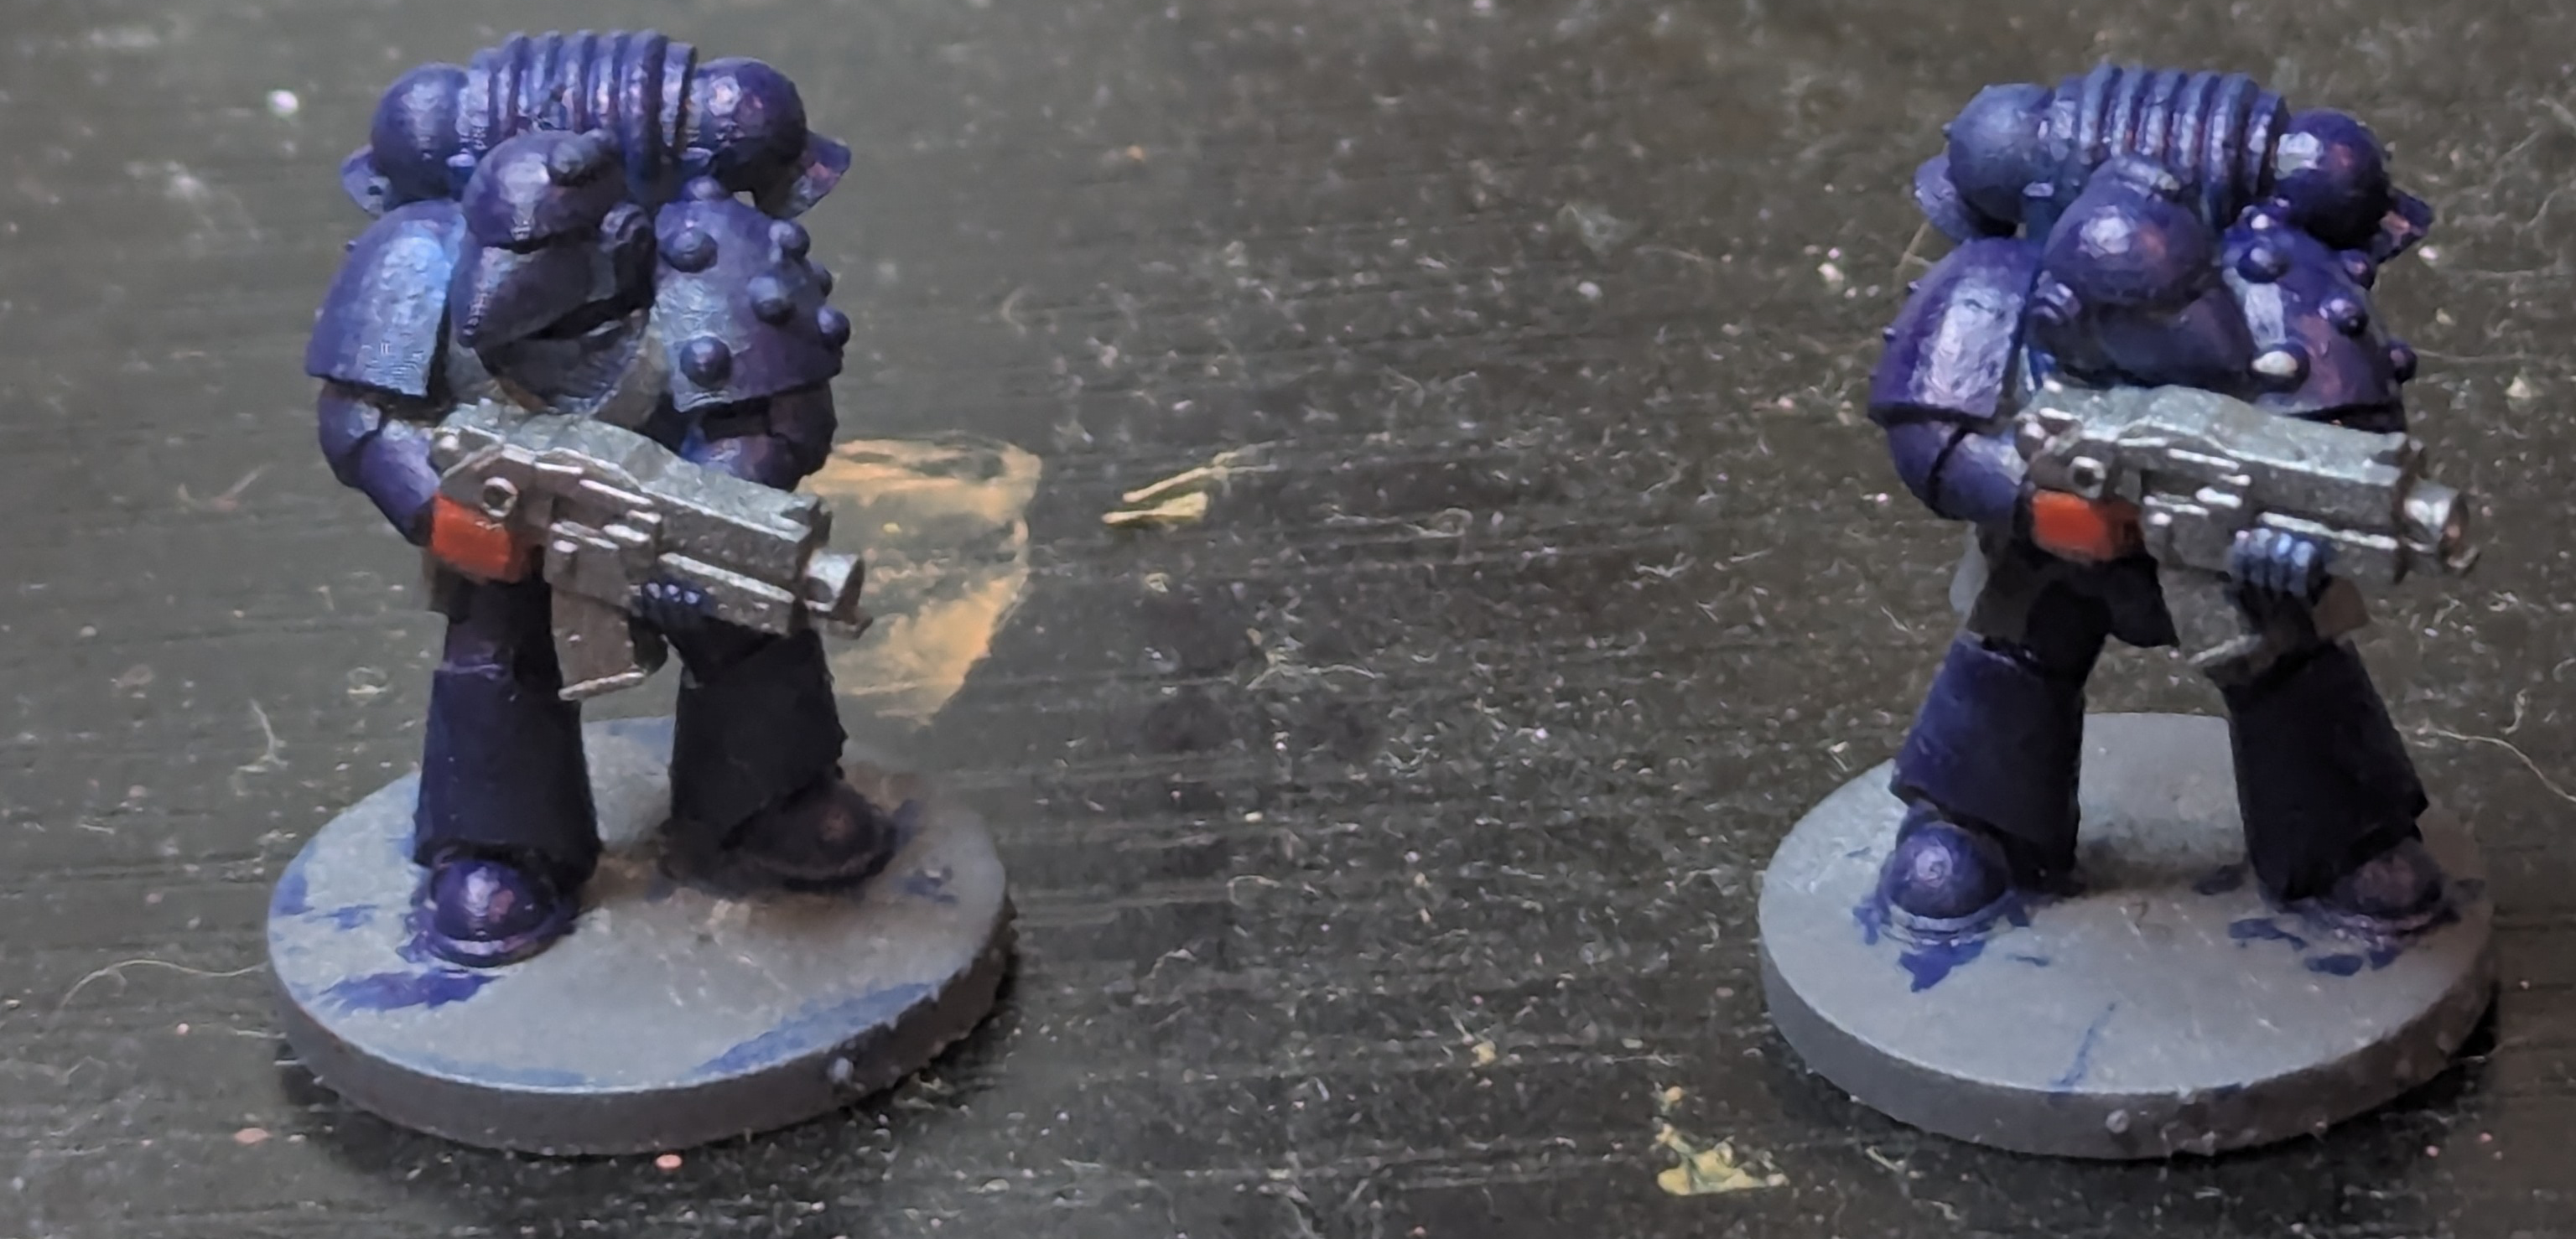
Paint the pouches using a light brown/leather brown color (I think I used Army Painter’s Leather Brown), and then paint in the pouch buckles using the same gunmetal color you used for the bolter. Paint any fragmentation grenades on the marine’s belt using a medium or dark green. I used AK Interactive’s Medium Green.

Drybrush the coils on the back of the backpack with the gunmetal, as well.

Crimson Fists with pouches and grenades painted

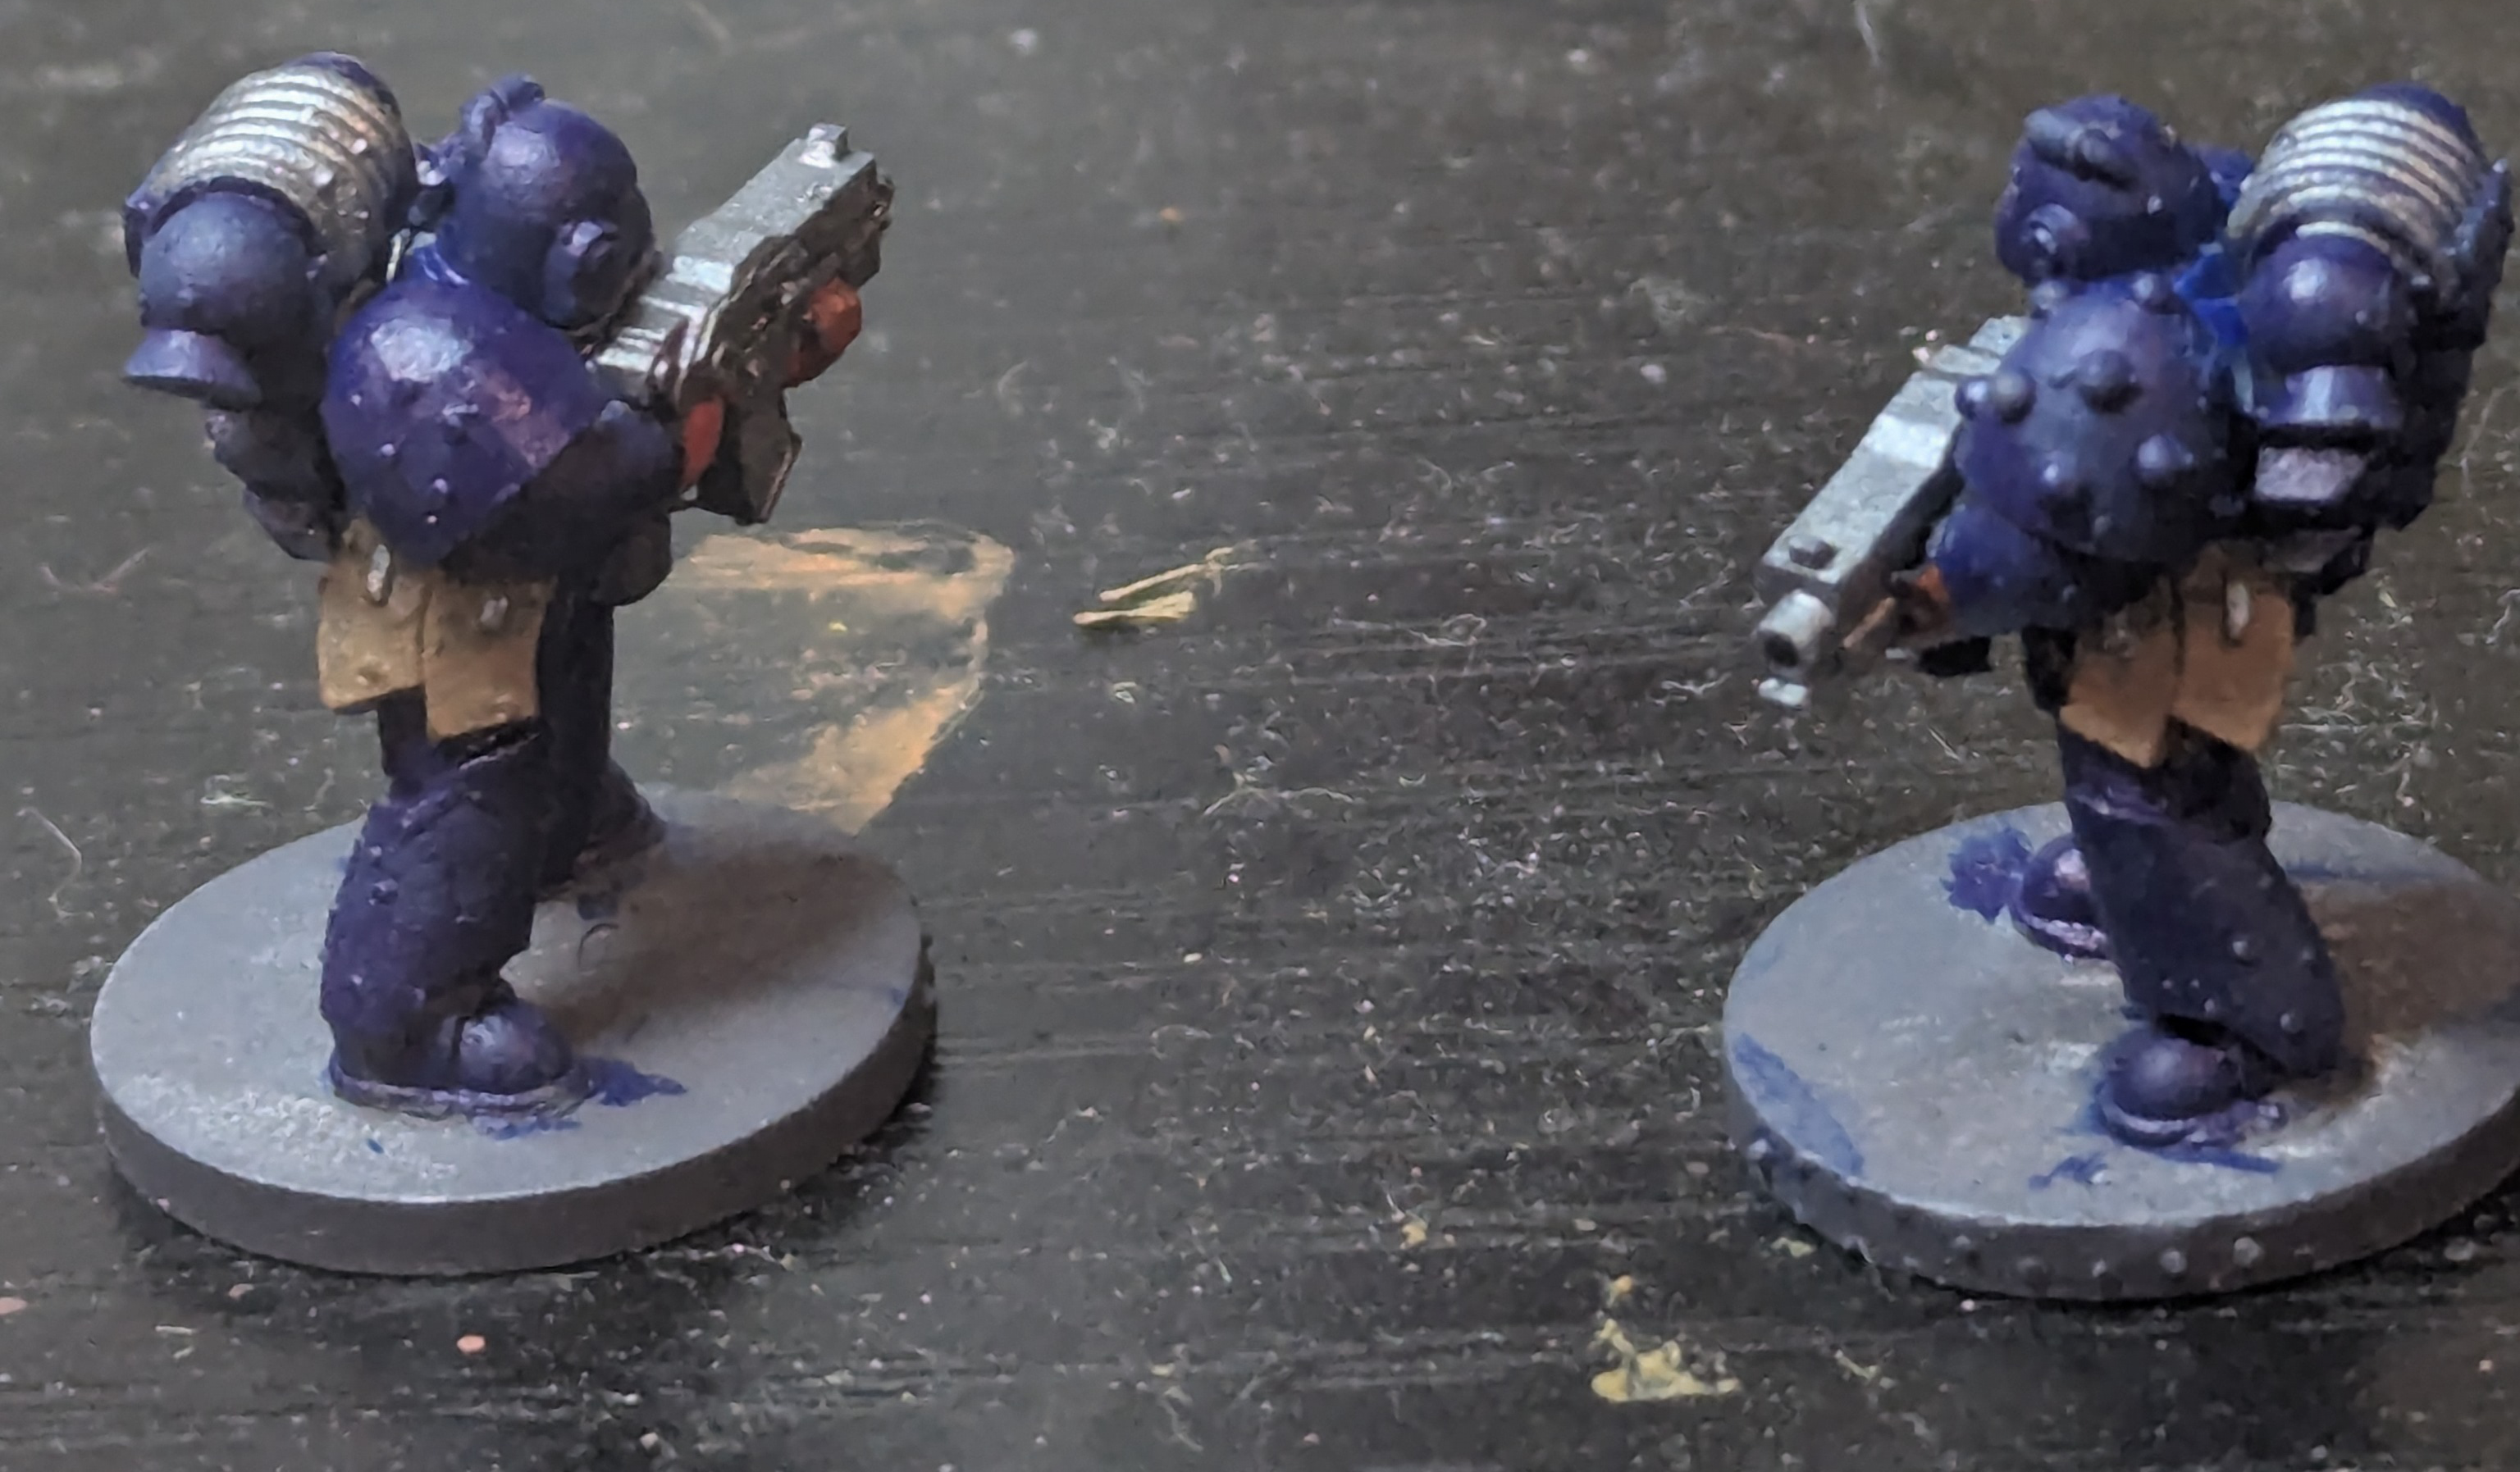
When it comes to basing, I went for as simple as possible. A quick coat of Army Painter’s Dirt Spatter on the base and the rim makes for a simple enough base. If you want to go fancier (not really needed at this scale, IMO), you could paint on some PVA/white glue and flock the base with some static grass and rocks.

Completed Crimson Fists miniatures with bases

And that’s it, our Crimson Fists are done. These two guys took me about 20 minutes total for both of them, so it would be pretty easy to get a whole squad done in an evening - especially if you batch painted or used an airbrush.

Hopefully this tutorial helps you get your Crimson Fists army on the table faster!

Happy painting!

Cover image for An Introduction To The Trials Of Herakles

Have you ever wanted to kick Herakles’ ass? NOW YOU CAN.

Welcome to the “The Trials of Herakles”.

So what is “The Trials Of Herakles”?

Put simply, “The Trials Of Herakles” is a twelve-scenario mission pack that reimagines each of Herakles’ twelve labors through the lens of encounters in DEMIGOD. You can slay the Nemean Lion, try your best to clean out King Augeus’s stables, pit your wits against Hippolyte of the Amazons and more. The book is designed with solo play in mind (as is the DEMIGOD core rulebook), but I am playtesting a set of profiles to allow a second player step into the sandals of Herakles himself and really see if they can get the labors done before your adventuring party does.

What else is in the book?

Besides the twelve labors, you’ll have three different boons from Hera, allowing her to be your demigod’s patron if you so choose. You’ll also have access to the bestiary at the back of the book, meaning you can add the monsters you encounter in “Trials of Herakles” to your monster hunts in normal games of DEMIGOD.

What do I need to play?

Besides a copy of the “Trials of Herakles” beta rules (available here), you’ll also need a copy of the DEMIGOD core rulebook (available here from my own site, or here as a PDF from Wargame Vault), as well as some miniatures to represent both your own adventuring party and the monsters you’ll encounter throughout “The Trials of Herakles”. For a general primer on what miniatures match the “vibe” of DEMIGOD, check out this post I made a couple weeks ago on the subject.

If you’re looking for miniatures specific to “Trials Of Herakles”, so far I recommend this lion by Epic Miniatures. I’ll keep this post updated as I work through the other 11 scenarios, so if you’re looking for inspiration for tackling the quests from “Trials of Herakles”, don’t forget to check back!

Cover image for Writing Crunchy Rulesets For Your Tabletop Games

A couple weeks ago, Justin Vandermeer (who runs Shout Crow Press) reached out for help with his game KILL THE DUKE. He was having trouble writing rules that helped put players into the role of a medieval serf attempting to kill their liege lord with the help of a magical sword - or so he thought. I remember him telling me that he felt that KILL THE DUKE didn’t have a good solo system, at which point I fired back with “How is ‘ascend the tower and kill the Duke’ not a functional solo system?” After some more back and forth, we got to the real meat of things, which is “why do people enjoy crunch?” And in order to answer that, first we have to answer “what is crunch?”

What Is Crunch?

“Crunch” means different things to different people, but at its core, you can define a crunchy game as one that has complex interactions in the mechanics. In other words, “If I take Action A, then this happens which also causes this happen, which means I can’t do this…” and so on and so forth.

In addition to signalling mechanical complexity, crunch also usually signifies mechanical diversity - that is, that there are more differences to dwarves and elves than needing different-sized barstools.

Why Do People Like Crunch?

So what is it about crunch that people like? Generally, crunch provides for more rewarding interactions than the “I shot you!”/“Uh-Uh, you missed!” games of Cowboys and Indians from when you were a kid. Having an actual ruleset (or at least some third party to adjudicate disputes) keeps every player on the same basic playing field and helps make the game more fun and rewarding for everyone.

Beyond grounding people in the same basics, the mechanical diversity afforded by crunchy rulesets means that the creatures and concepts espoused by the ruleset look different and feel different because they play differently. If a human’s base movement speed is 6” and an elf moves 8” to a dwarf’s 4”, players will intuit that elves are fast and graceful and dwarves slow and purposeful without necessarily needing fluff to tell them so.

How Do I Write A Crunchy Ruleset?

Before you sit down to write your rules, there’s two things to consider:

  1. What kind of game you’re writing
  2. The “fluff” - the narrative you are trying to convey to the player with your game

When it comes to writing a crunchy ruleset, the type of game you’re writing matters. A crunchy ruleset for a fantasy tabletop roleplaying game will look very different from a wargame set during the War of the Spanish Succession, for example.

Once you’ve decided what kind of game you’re writing, it’s time to consider your “fluff”. Fluff is the narrative you are trying to convey to the player with your game. Even the most crunchy, bony, grognard-y rulesets have some fluff, although that fluff might be historical context rather than written fiction. Narrative is important because it gives your players a reason to invest in your ruleset - even if that reason is simply “I have two groups of toy soldiers and I want to play a game with them.” A good example of this is Blackmoor, a tabletop roleplaying and wargaming setting designed by Dave Arneson for his games of Chainmail, a ruleset written by Gary Gygax.

Chainmail rulebook cover

Once you have a narrative in mind, use that to define the basics of the rules you’re writing. For example, if you’re writing rules that portray the Peloponnesian War, then you need to create stats for hoplites at the very minimum.

After you define those basics, it’s time to add your mechanical diversity. Using our Peloponnesian War example from earlier, there’s no immediate mechanical diversity - a hoplite is a hoplite is a hoplite. So how do you add it? There’s a couple ways:

  • Adding special rules
  • Tweaking profiles
  • Both of the above

Special rules are probably the easiest way - you might give the Spartan hoplites a “Spartan Courage” special rule that says that they don’t get pushed back if they lose combat. That makes your Spartan hoplites play differently from from “basic” hoplites. The downside to adding special rules is that once you add one, you can end up with “special rules glut”, where, since special rules are the way you’ve chosen to make characters/units/factions stand out, every unit gets one. Having too many special rules will make the game much less fun and enjoyable than having too few.

If you can’t (or don’t want to) add special rules, tweaking unit profiles is the next best thing. If a standard hoplite’s Morale is 4, a Spartan hoplite might have a Morale of 6 to represent that Spartan courage we talked about earlier. Tweaking unit profiles is a little more messy than adding special rules, though, because every time you tweak the profile, it has to (or at least it should) go through playtesting again to make sure that the tweaks you made line up with your vision for the unit or character in question.

Probably the thing that provides the most “complex interactions” is a combination of both. Each unit or character in your game has its own unique profile and its own unique special rules. Take, for example, Warhammer 40,000’s poster-boy unit, the Space Marines. Not only do Space Marines have their own unique unit profiles, they also have their own unique special rule, And They Shall Know No Fear, which lets them auto-pass Morale tests. Combined, the unique unit profiles and unique special rules mean that Space Marines - an order of warrior-monks gene-enhanced to be the Imperium’s super-soldiers - play very differently from the other factions in the game.

Example of a special rule from a wargame rulebook

How you add crunch to your rulesets is ultimately up to you - what matters, though, is delivering enough complex, meaningful interactions that your players keep coming back to your rulesets again and again.

Balancing Rule Volume And Complexity

When it comes to writing crunchy rulesets, one of the big things to keep in mind is volume doesn’t equal meaningful complexity. Just because your game has lots of rules, doesn’t mean that it will be provide the player with meaningfully complex interactions. Rather, tons of rules are more likely to bog down both the player and the game - see SPI’s 1978 wargame The Campaign for North Africa as an example of this. So how do you balance rule volume with rule complexity?

The best way to handle this isn’t so much a matter of complexity vs volume, but moreso matters of readability, presentation and the overall intuitiveness of rules as presented. Written rules tend to exist because they’re answers to questions that players have asked. So, essentially, write only as many rules as your players have questions about the system. Once your system answers most (+/-95%) of a player’s system-related questions, you can consider it complete.

Cover image for How To Build Terrain For DEMIGOD

So in my last post, I talked a little bit about the different miniatures ranges you can use to build the heroes, minions and monsters you’ll need for your games of DEMIGOD. This week we’re going to take a look at the different quests included in the DEMIGOD core rulebook and how you can build some truly awesome terrain for each one.

The Minotaur’s Maze

Of the six core quests in the DEMIGOD rulebook, this is probably the most challenging one to build terrain for, solely because a 3’x3’ maze is such a pain in the behind to build. When it came time for me to build mine, I did it two separate ways. You can build or buy your own blocks and assemble the maze by hand, or print/buy maze sections and assemble the maze that way. If you want build your own blocks, Black Magic Craft makes an excellent video on making your own out of XPS foam. Alternatively, you can buy appropriately-sized bricks from a variety of Etsy sellers - I used Gravik out of Ukraine.

Black Magic Craft tutorial on building dungeon blocks

When it comes to printing or buying maze sections, there are a couple options. EnderToys makes a series of click-together dungeon tiles that would let you get a maze together rather easily. While they do come together quickly, their main disadvantage is that they limit you to using only 28mm-scale models - the walls are too small for anything else.

As for printed options, I initially used these miniature modular stone walls by QT_studio over on Cults3D. They have the advantage of being rather large sections of wall (the long sections are 1/16th of an inch shy of 4 inches long). However, because they’re not exactly 4” long, the missing 1/16th of an inch really adds up when you’ve got a three-foot long section you’re gluing together.

The Garden of Statues

I’ll be honest and say that the board I built for The Garden of Statues (which I took to Fall In 2024) is the only board I’ve actually built for DEMIGOD. It’s not the best representation of what a DEMIGOD board could be, and there’s a lot I could do better to make it look more like what a DEMIGOD board should look like.

The Garden of Statues game board for DEMIGOD

So what would I do differently?

The first thing is that I would have a larger temple setup as a centerpiece. The few ruined columns I have don’t make nearly enough of a good center area. I’d recommend something like the Sarissa Precision temple or the Tartarus Unchained Temple of Athena by Gadgetworks.

Once I had the center temple built, I would add some subsidiary buildings such as a fountain or animal enclosure. If you want to get some fountains for your own board, Sarissa Precision makes a set of fountains perfect for 28mm. Or you can use the Kobold’s Craft video below to build your own.

Kobold's Craft tutorial on building fountains

Typically, Greek temple buildings sat inside of a larger area called a temenos, which was demarcated by a dry-stone wall called a peribolos. There exist a number of rollers to make your own stone walls out of XPS foam, but I’ve found that the most realistic way is to get a bag of pea-gravel from Home Depot or the like and start gluing. Once the stone wall is completed, add some olive trees around the outskirts.

If you want to see step-by-step how this new board will look, tune in next week!

The Island of the Cyclops

For the island of the Cyclops, you’ll need to cut an island from a large enough block of XPS foam, then attach it to your board. Once it’s attached, flock it with some sand and then paint the surrounding area ocean colors - blues, greens and blacks. If you want some inspiration for island colors, you’d do good to Google the Cyclopean Islands - they’re the islands off the coast of Sicily that Homer based Odysseus’s encounter with Polyphemus on. If you want a more hands-on tutorial, Play On Tabletop over on YouTube has a great tutorial wherein he builds a board to replicate Scarif from the Star Wars universe: all of these techniques can be transferred to your Island of the Cyclops board.

The Boar Hunt

The board for “The Boar Hunt” is a little more free-form, described only as “a destroyed Greek town”. But what does that look like in practice? You’ll want a lot of broken columns, a destroyed temple or two, amd maybe some broken sections of road. Ancient Greek dwellings varied: depending on the wealth of your citizens, houses could range from two to twelve rooms, with those rooms split between multiple levels. Many dwellings had a central courtyard. An example layout is below.

Floor plan diagram of an ancient Athenian house

One or two of these, suitably ruined and combined with some other scatter terrain (such as this set) should stand you in good stead.

The Colchian Fleece

The layout for the Colchian Fleece is a pretty simple one. Multiple groves of trees (olive or otherwise) ring a central tree upon which hangs the fleece itself. You can get 28mm trees from a number of vendors, or make your own using a metal armature and some different kinds of flock. As for an actual Colchian Fleece model, I quite like this one by Steve Barber Models, just because it looks like a proper centerpiece.

The Centauromachy

A board for the Centauromachy quest is a little unique. Why? See that Athenian house lineart further up the post? The quest takes place entirely inside the central courtyard of a really, really big Greek house. So think fountains, trees, stuff like that. Essentially, you don’t really have a “centerpiece” here - you have a lot of smaller terrain pieces that impede player movement, but there’s not necessarily one terrain feature that unifies the whole board. If you wanted to, you could build your own Greek palace and put it off to one side of the board, letting the courtyard sprawl out from the interior and across the rest of the board.

So that’s how to build boards for the different quests you’ll encounter in the DEMIGOD core rulebook. If you’ve got any Qs about building your own board, feel free to shoot me an email at chris@no-name-games.com.

Cover image for Miniature Range Options For DEMIGOD

Since releasing DEMIGOD in November of 2022, I’ve received several questions on where to get fitting miniatures to represent your heroes, minions and monsters - so much so that I’ve actually put a whole channel on the DEMIGOD Discord just to address the question.

DEMIGOD is a skirmish wargame set against the backdrop of Greek mythology, playable with as few as four figures on the board. It is manufacturer agnostic and the rules are flexible enough that you’ll find equivalent models for almost every model in the book in the catalogue of any company that makes an “Ancient Greeks” range.

With that out of the way, let’s talk manufacturers. There are a TON of miniatures manufacturers out there, and many of them make miniatures that would be compatible with DEMIGOD - perfect for representing your heroes, minions and monsters, but I’m just going to talk about the ones I’ve used for my own collection.

Heroes and minions

Since your heroes and minions are going to be constantly rotating through your warband, it’s important to have a lot of them! Let’s take a look at the best ways to fill out your adventuring party.

Victrix

Victrix’s multipart kits are the absolute bang for your buck when it comes to building a DEMIGOD warband - so much so that they’re one of two manufacturers (the other being Warlord Games) that I point to when people ask what they need to get started with DEMIGOD. In addition to your bog-standard hoplites (perfect for your demigods themselves as well as, well, hoplites), Victrix produces a variety of kits that build almost every kind of minion you’d want to hire in DEMIGOD.

Now, for the purposes of a small-model-count game like DEMIGOD, the Victrix kits are a little overkill. The newest hoplite kit contains 48 figures, which is enough to build 16 warbands at the minimum warband size.

Victrix Greek hoplites miniatures

Additionally, the new kit seems tailor-made for skirmish games. Each sprue comes with seven different bodies plus a variety of different arms and heads, allowing you to create a warband that is dynamic and characterful even if your weapon choices are limited to swords, spears and shields (and a severed head!).

Victrix peltast miniatures

The peltast kit will fill out your ranged troops - giving you, as the box itself says, a range of peltasts, javelinmen and slingers. This gives you a variety of ranged options, from long-range slings to the peltast’s spear, which can cripple an enemy model as it attempts to close.

The last kit I’d recommend from Victrix is their “Greek Unarmored Hoplites and archers” kit, which gives you 48 hoplites in tunics and eight different archer options - perfect for novice demigods with not a lot of coin to their name or a minor hero of Apollo, the god of archers - or even just an archer minion himself!

Victrix Greek archer miniatures

About the only thing I’d call out with the last two kits is that the detail on them feels a little soft when compared to the new hoplite kit. Hopefully we see a re-release of these kits with some better detail!

Wargames Foundry

Metal miniatures manufacturers that also hail from Great Britain, Wargames Foundry (WGF) is the brainchild of Cliff and Brian Ansell. For those of you who are Games Workshop grognards like me, Brian Ansell is also one of the founders of Citadel Miniatures, which later became part of Games Workshop.

All of WGF’s kits are 1 to 3-piece metals: depending on which kit you get, you’ll have to attach a spear, a shield, neither, or both. In terms of the spears themselves, I recommend replacing the included spears with the NSS102 spears from North Star Military Figures, Artizan Designs, or Crusader Miniatures - they’re a little thicker and fit the models’ hands better, although they do need trimmed to size.

This makes them really fast to get onto the table - there’s not a ton of assembly required. At the same time, the poses tend to be rather generic, and some of the hoplite poses take a little finagling to get the spears to sit properly.

Almost all of the sub-ranges under WGF’s “World of the Greeks” range are suitable for DEMIGOD - in fact, the only range that I’d say isn’t suitable is the Thracians, and even then only because they don’t fit the “hoplite aesthetic” of the rest of the range.

Perhaps my favorite kit is WG162 “Herakles and the Argonauts”, which features 5 models with swords and shields plus a sixth representing Herakles himself - perfect for a Major Hero plus several Minor Heroes and the Hero of Legend, Herakles!

Wargames Foundry Herakles and the Argonauts miniatures

3D Breed

The newest addition to my collection and the only non-physical hero/minion models on this list, 3D Breed’s “March to Hell: Rome” range is perfect for games of DEMIGOD. Not only do they have a sample hoplite, but the whole range should get your DEMIGOD warband pretty well stocked.

You can find STLs for Jason and the Argonauts, plus hoplites (both in armor and tunic), psiloi (slingers), peltasts and Cretan archers. There’s also a separate, smaller range for Spartans that’ll give your warband a little flavor with Spartan hoplites and an STL for Leonidas himself - perfect for your Major Hero!

3D Breed Leonidas miniature

monsters

When it comes to the monsters that stalk through the annals of Greek antiquity, a 3D printer is going to be your best friend. While there are a couple metal and plastic miniatures out there, (WGF has medusae and a kit that includes Theseus, the Minotaur, and some pillars, while Reaper’s metal Bloodhoof miniature is a particular treat), the vast majority of Greek monstrosities are found in the land of liquid resin.

Minotaur miniature

The Medusa by ArtOdyssey over on Cults3D was the one I ended up using for my demo game of “The Garden of Statues” at HMGS Fall In this past year, and it’s probably the only one I like out of the ones I’ve found - that is, it’s the only one that isn’t gigantic and doesn’t come with added weapons.

There’s one other model I’d like to call out, just because of how awesome it looks: the Cyclops by “clynche art” over on MyMiniFactory. One of the Discord users printed it and posted a picture that came out looking so awesome.

Polyphemus the Cyclops miniature

There are way more options than these when it comes to models that mesh with Greek antiquity. One of my goals when I wrote DEMIGOD was to let my players step into the sandals of some of the heroes of Greek mythology, so go forth and find the models that speak to your hero’s soul!

Buy DEMIGOD from No Name Games.

Cover image for So You Want To Write A Miniatures Wargame, Part Two

So in the previous post in this series, we talked about some of the basic things that you should think about when you design a miniatures wargame, such as who you’re writing it for, why you’re writing it, and some of the creative constraints you might need to keep in mind as you start designing your game. But how do you actually design a game?

Work Backwards To Go Forwards

It might sound a little counter-intuitive, but sometimes the best way to design a game is to start at the end. What do you want these rules to do? Identify the overall feeling or “vibe” you want for your players - e.g. “I want each player to command a fleet of starships.” Once you’ve decided on the overarching vibe, the next thing to do is to figure out the important actions you want your players to do in support of that overall vibe.

For example, if the overall goal of your players is to command a fleet of starships, then the important actions for your gameplay loop might be “issue orders to your ships” and “deal with command friction”.

Create Your Gameplay Loop

Once you’ve decided on the important actions for your players, it’s time to break them down into a gameplay loop - the repetitive actions that your players take when they’re playing the game. So, taking “issue orders to your ships” as our first example, you have to decide:

  • What orders can you issue to your ships?
  • What are the conditions in which you can issue these orders?

The orders you can issue to your ships might be, at their simplest: move, shoot, release fighters, and repair damage. Let’s say that a ship can move 6” in a forward direction and turn once during that movement. That’s your movement taken care of.

Shooting is similarly generic: ships can shoot at other ships as long as they are “in range” of the firing ship’s weapons. This opens up a further question to consider - do your ships’ weapons have one single range (e.g. 24” for autocannons, 36” for railguns, etc) or range bands whereby a ship’s weapons become less likely to inflict damage the further out they are from an enemy ship?

Before you can consider your next two orders, you have to consider damage. How is damage tracked? Do ships have armor? Shields? Or is it just a straight “health” pool and the ship goes kablooey once it reaches zero?

“Release fighters” is where things start to get complicated, and where your two initial questions start to meld together. What kind of fighters should your ship release? When? How do you track damage to fighters? How do fighters deal damage to ships?

Imperial starfleet ships from a space combat wargame

The last order, “Repair”, continues the damage questions from earlier. When a repair is triggered, how much damage should it heal (typically you’ll figure out an answer to this in playtesting)?

As you ask yourself these questions, your gameplay loop starts to develop. You know what your core orders are, now you just have to figure out when those orders can be issued.

Define An Order Of Operations

Almost all wargames have some kind of turn sequence and if they don’t, have some way of trading off who is the active player. There are a number of ways your turn sequence can go: the old standby is IGOUGO, which, as the name implies, has one player complete all actions of a certain type before the other player can complete their actions. So the initiative player does all their movement, then the non-initiative player. Repeat for shooting and other phases.

Other options include alternating activation and alternating initiative:

  • Alternating activation is when players alternate activating single units and completing some number of actions with that unit before initiative passes to the other player. So I might activate a frigate, move it 6” and then shoot at your destroyer. Once my shooting is done, initiative passes to you.
  • Alternating initiative, on the other hand, plays a little differently. There is an “initiative player” and that player can activate any of their units as many times as they want until certain conditions are met, at which point the other player becomes the “initiative player”.

Decide on the turn sequence that best fits the kind of game you’re trying to write. It’s totally fine to start your game with IGOUGO and switch over to alternating initiative in a later playtest. Speaking of playtesting…

Playtest, playtest, playtest

Once you’ve decided on a turn sequence and fit your orders inside it, it’s time to start playtesting your game. Get a friend and some ships together and run through an ‘Annihilate’ mission - this is the simplest way to get to grips with your core ruleset. Take notes and ask questions as you go. Some good starting questions to ask would be:

  • Does the game consistently have interesting decisions to make?
  • Can you explain why the victorious player won?
  • How much time did you feel like you were playing for?
  • Did the game feel like it was dragging?

The first two questions above are incredibly important because a game without interesting decisions quickly becomes boring and if players can’t explain why they won (or why they lost), it may quickly lead to frustration, which quickly leads to abandoning the ruleset in favor of something else. The other two focus more on how much time the game takes to play - players won’t want to play a game that drags, and IGOUGO systems in particular can feel like they drag because one player is literally waiting their turn.

As your ruleset becomes more mature, some follow-on questions to ask include:

  • Did you notice any potentially game-breaking strategies?
  • Did anyone do anything odd that might be an issue?

These questions focus primarily on game balance. A word to the wise: “balanced” does not mean “fair”, especially in game design. All balance means is that if you have an X, you also have an anti-X. Balance is one of the first things players will look for when they start playtesting your game - if Alice can play the Empire and take 30 Star Destroyers and all I can take as the Rebellion are 10 X-Wings, not only is the game not balanced, it’s also not fun. And building something fun is probably one of the core reasons you’re reading this series in the first place

I hope you enjoyed Part Two in this series. I’m not sure when Part Three will be out, so keep your eyes peeled!

Cover image for So You Want To Design A Miniatures Wargame: Part One

So you’ve heard that Star Wars Armada is going away, and you want to write a your own game of grand fleet battles for you and your friends who are fellow Star Wars fans. But where do you begin? How do you write a game as complex as Star Wars Armada from scratch?

Start With Someone Else’s Rules

No, really. Read as many tabletop wargaming rulesets as you can. Read them again. Read tabletop RPGs, too - the first tabletop RPGs started as offshoots of tabletop wargames, after all. You’ll either find mechanics that you want to repurpose in your own work, or they’ll inspire your own ideas.

Once you’ve got a good grasp of what makes a wargame a wargame, the easiest way to start writing your own is by house-ruling the games you already play. Maybe all X-Wings have +1 on attack rolls against Empire capital ships, for example. Start with small rules changes and slowly work your way up.

Modifying rules is a great exercise that teaches all the basics of rules writing without burdening yourself with the mental load of trying to come up with a complete game system from scratch. It’s a lot easier to take a game that you love 90% of and modify it until you love all 100% than it is to write that 100% from the ground up.

The Two Ws

Back from houseruling every game you can find? Still want to write your own game? The biggest question to ask yourself before you begin is “Why?” Why do you want to write a miniatures wargame? For most of us, it’s probably because the game you want to play doesn’t exist, but other reasons might include:

  • You’ve created a range of miniatures and you want to create a game to help sell them
  • You’ve written a setting/IP and you want to give players a way to explore the setting you’ve created
  • You want to get your name in print
  • Just because!

Figuring out why you’re writing a game is important because the decisions you make when you’re writing a game to sell a line of miniatures are very different from the ones you’ll have to make if you’re just making the game so you have something to scratch a particular gaming itch.

Once you’ve decided why you’re writing a game, figure out who you’re writing it for. Games that appeal to die-hard wargamers are written very differently from ones that appeal to newbies, ditto if they’re people that have only played games from bigger manufacturers like Games Workshop. And, of course, you can throw most of those considerations out the window if you’re just writing this for yourself or your gaming buddies.

Creative Constraints

Now that you’ve decided who you’re writing this for and why, you have to decide on your creative constraints - what are your limits when it comes to designing this thing? It can be tempting to say you have no creative constraints, but that’s a really easy way to spend tons of time at the drawing board with nothing to show for it.

Some common things to think about include:

  • Whether you’re designing just digitally or for print as well - print layouts are their own separate beast from digital ones, and what looks good digitally may look horrible in print and vice versa- we’ll talk about this in another post.
  • Is this a one-off, or do you plan to write expansions?
  • Do you have a budget for art and layout? What parts of this process can you do yourself?
  • Are you just writing a rulebook, or are you planning to make miniatures and other accessories too? (This post from Massive Awesome is a couple years out of date, but it does a great job of outlining the costs of getting even a single miniature to production)

If you’re writing your game because you want to sell it (whether yourself or to a publisher), the questions above will become the core formation of your business plan.

Once you have the answers to those questions, it’s time to dive into actually designing the game, which is where we’ll pick up with the next post in the series.

Cover image for What's My ATK Again?

When it comes to first introducing someone to a new wargame, a quick-start guide is essential for getting up and going. Quick-start guides offer a gradual start into a particular wargame, giving players just enough rules to get them gaming without overwhelming them with minutiae. So what do you need to consider in order to write a good quick-start guide?

Consider Your Audience

The first thing you need to do is consider your audience. How much wargaming experience do they have? Are they familiar with your game and its conventions or just wargaming in general? A good way to strike the balance between an audience that knows your game and one that doesn’t would be to include a 1-2 page blurb (with plenty of pictures!) that introduces the reader to your game world. It will serve to draw in those who are unfamiliar with your game world, but those who are already familiar can easily skip it. Likewise, if your quick-start guide is bundled with multi-part plastic miniatures (as most of the quick-start guides from Games Workshop are, for example), including an assembly guide is always helpful.

Decide How To Frame Your Content

A quick-start guide should start small and build up so that players learn the rules in manageable chunks. There’s two main ways I’ve seen this presented:

  1. Present a blocked-out overview of the game table, with each block going through some different aspect of the game.

Example of a blocked-out game overview layout

  1. Design individual missions, with each mission adding on to the mission before it until players are using most of the rules in a single mission.

Example of a first mission layout from a quick-start guide

Blocked out overviews are great for covering all aspects of the game rules that a new player might be curious about. They take up relatively little space, too (the Battle For Black Reach overview is a two-page spread), meaning that you can pack your quick-start guide with other content such as model assembly guides or painting tutorials.

Conversely, linked missions are better for learning the actual rules since they start players with the absolute rules basics (usually moving and attacking) and then build up from there. For example, the Battle For Macragge quick-start begins with movement and shooting and then adds assault rules in the third mission. The second and fifth missions also expand the shooting rules, adding flamer and blast templates.

Once you’ve decided between a blocked-out overview and a linked mission list, the next thing to do is consider layout.

What About Layout?

The best quick-start guide in the world won’t get eyes on it if it’s not laid out well. So how do you properly lay out a quick start guide? There’s two big things to keep in mind:

  1. Clear, consistent headings are important. Choose a single font for all of your chapter titles, a single font for all your subheadings, etc, and stick to it. This consistency makes your quick-start guide easy to read and easy to follow, which are the two most important qualities of any QSG.
  2. Annotated screenshots trump text. Showing game mechanics through a screenshot of the board along with a small text box is much more visually appealing than the same concepts explained via paragraphs of text.

Annotated screenshot showing spore mines with blast template

For example, the screenshot above shows that when spore mines detonate, they hit everything under a small blast template. This is much better shown visually by physically staging a spore mine under a small blast template and taking a picture.

Make Things Stand On Their Own

Once you’ve decided how to frame your content and decided on layout, the last thing you need to consider is how much content to include. You want your quick-start guide to stand on its own - that is, a prospective player should be able to pick up your quick start guide and, by the time they’ve read/played through it, they should be able to play an actual full gameplay loop of your game without necessarily consulting the rulebook.

Consider your gameplay loop. What are the main phases of your game? Ensure that each phase is included somewhere in your quick reference guide. The best way to do this is to slowly build them into subsequent loops, where each loop expands on the previous loop. So the first gameplay loop might be movement and shooting; the second might be movement, shooting and close combat; the third might add on morale tests, too. The goal of this is to use steadily-increasing gameplay loops to gradually introduce your game’s concepts to your players so that they are not overwhelmed. For someone new to wargaming, having to deal with movement, shooting, close combat and morale checks for multiple units can be dizzying - much better to start with as few models and as few concepts as possible.

Decide how many mini-gameplay-loops you need to introduce your gameplay concepts. Usually, you’ll have as many mini-loops as you have concepts, with the end goal being that the last mini-gameplay-loop is in fact a full gameplay loop - each of the concepts of the previous loop has been included in it.

Include a hook. Once players finish your quick start guide, their immediate question is usually “what do I do next?” Including a section that answers these questions is a great way to keep your players engaged with your game.

In Conclusion

So, here’s how you write a good quick start guide for your next wargame:

  1. Consider your audience, their wargaming experience and their experience with your games.
  2. Decide on how to frame your content. Using linked missions that steadily increase the number of game rules shown to players is usually best.
  3. Use clear, consistent headings.
  4. Turn your rules explanations into annotated screenshots where possible.
  5. Include a hook to draw prospective players further into the hobby.
Cover image for Handling Artillery In Modern Skirmish Wargames

The Nature Of Artillery

Before we can decide how to represent artillery in a tabletop wargame, first we have to settle on a definition of what artillery is. At its most basic, artillery is just a class of ranged weapons that launch munitions far beyond the range of human or powder-powered smallarms (bows, slings, crossbows, rifles, etc).

From its first incarnation as fairly-immobile siege engines used to breach enemy fortifications, artillery has evolved both in mobililty (horse-drawn and wheeled cannons all the way up to man-portable mortars) and lethality (solid shot all the way up to modern high-explosive rounds).

Since modern artillery generally fires high-explosive rounds unless directed otherwise, it can be assumed that the artillery a platoon or company commander would have access to would be firing this as well.

Artillery As Area-of-Effect (AoE) Weapons

The use of high-explosive ammunition usually means that when artillery shows up in a tabletop wargame, its destructive power is represented by a blast template (shown below). Usually, larger artillery pieces such as towed guns use the 5” template, while smaller guns like mortars use the 3” template.

Blast templates of various sizes for wargaming

But why is this the way things are done?

Quite simply: because you need a way to designate artillery that is visible to both you and your opponent. But, if the rules for them are written correctly, templates can become much more than just a hammer of doom that hits your opponent. One way to handle this is to place the template during your turn, but have it “go off”/take effect during or after an opponent’s movement phase.

Not only does it give your opponent a chance to react to the incoming template, but it also opens up tactical possibilities, as well. You can place templates to funnel enemies in a certain direction or deny them a section of the tabletop - both things that artillery is used for in real life.

Artillery Without Templates?

But what if we don’t want to use templates? They’re one more thing to ask players to have on hand, they can get lost easily, etc. Instead, we can designate a square of some distance (Chain of Command uses 18”, for example) and use that as your template.

Another way to handle it is to use the intrinsic bases of the troops themselves, like Crossfire does. The Crossfire rules essentially say “pick a squad, roll dice against them, any other squads within 1 stand/base-length are suppressed”.

Whichever way you choose to handle it, your system needs some way to designate that every unit in a given space is being hit by incoming artillery.

”Spread out - they got us zeroed!” - bunching up, AoE and morale

Being hit by incoming artillery tends to degrade unit morale, and units with degraded morale tend to bunch up, making them easy targets for AoE weapons like artillery and machine guns.

One way to represent this is by having the cohesion distance inside a unit decrease every time the unit fails a morale check, to the point where every model in the unit is base contact with every other model in the unit - a perfect target for a template.

Having unit cohesion slowly degrade as morale degrades ties into making morale failure a more gradual thing, which I discussed in my post on handling morale in miniature wargames a couple months back.

To recap

  • AoE can give you tactical choices depending on how you employ it
  • AoE templates can act like interactive terrain
  • tie together AoE weapons, morale and unit cohesion.
Cover image for Modern Combat Mashup - a first look at No Name Games' new project!

So I wanted to apologize for the second hiatus. To be honest, I didn’t feel like writing blog posts. Or games, if I’m honest. You know that saying of “Find a job you love and you’ll never work a day in your life”? Well, writing games was starting to feel a lot like work.

Now that I’ve taken a bit of a break, I’m back in business. Expect new blog posts, plus new game content. I’m about 40% done with “The Trials Of Herakles”, and I’m hoping to get that out to playtesters by the end of this year (2024). I’ve also had a new game in the works. Well, for a given sense of “new” - it’s a rewrite of a game I finished years ago and never released. That game was called “Humanity In Flames”. It started life as a what-if scenario: I’d just finished Dan Abnett’s “Embedded” and the way he’d written combat really stuck with me. I wanted to write a game that evoked the combat in that book - something frenetic and fast-paced.

Cover of Embedded by Dan Abnett

What I ended up coming up with could best be described as “Force On Force without all the charts.” It combined basic versions of the unit profiles from Warhammer 40,000 4th edition with Force on Force’s troop quality dice, and played much more like Warhammer 40,000 than it did Force on Force. Throw in Chain of Command’s army list system, and you have the first version of Humanity In Flames. I eventually re-scaled the game into a 15mm company-level wargame, but that still didn’t get me exactly where I wanted.

Enter Covering Fire

From there, I went back to the drawing board. I re-examined what I wanted out of my game: fast-paced, frenetic combat that didn’t worry about bean-counting. So I started poking around. I already knew Chain of Command, but I wasn’t a huge fan of its Chain of Command points. Eventually, I stumbled upon Covering Fire, a little two-page ruleset from the folks behind One Page Rules (OPR). While it doesn’t appear to still be available on their website, Covering Fire was OPR’s take-off of Crossfire, a company-level WWII wargame written by Artie Conliffe in 1996. Covering Fire (and Crossfire before it) is designed to be a fast-paced game, for all that it’s company-level. There are no turns. There is no measuring. Units move from terrain feature to terrain feature. Units accrue “pin markers” that are a representation of how combat effective they are - the more pin markers a unit has, the less effective they are, until they’re killed.

Making It My Own

I kept most of these features, excepting that units have to move from terrain feature to terrain feature - this makes for terrain-heavy boards, and not everyone has enough terrain to saturate a 6’x4’ board. I added vehicle rules that are vaguely similar to Chain of Command’s, but vastly simplified. I still have to flesh out those vehicle rules I mentioned above, plus make some changes to how infantry work (namely as individual models vs stands). I hope to document those rules for y’all in some upcoming blog posts, so stay tuned!

In the meanwhile, you can read those rules (tentatively titled “Eleven Bravo”) here.

Cover image for A First Look At Feigr

I recently got a chance to take a look at FEIGR, a Viking Age TTRPG designed by Tadhg Lyons (creator of Wizard Pals and Raefenheim). FEIGR puts players in the role of Viking heroes as they live out their final days before they meet their fate. There isn’t much to the system right now - just a dice system, really, but it’s probably one of the more unique systems I’ve seen.

Each player gets 9 dice: 2 D6s, 2 D8s, 2 D10s, 2 D12s and a D20. When a player chooses to roll one of their dice, it is spent and can no longer be used. Once a player rolls their final die, their Hero’s Fated Day arrives - they will be dead by the end of the scene. This leads to a really punchy system where players have to decide when and how to spend their dice - they might end up with just one left sooner rather than later. This is a nice way of sidestepping the way D&D and other tabletop RPGs handle skill checks - because players have a limited number of dice, rolling over and over for the same skill check is a recipe for a quick death.

The other thing that makes FEIGR different is that the Skald (GM) does not call for dice to be rolled (e.g. “Roll Perception to see if you can discern who’s in the other room”). If a player says that they want their hero to do something, the Skald will either offer their opinion that a task might require a roll or say that using a roll might allow the hero to do something extra. In most scenes, the Skald’s only job is to describe how events are unfolding. It is the job of the players to use their dice to interject their will onto the tale being told.

That, I think, is one of the big draws of FEIGR for me and what makes me so interested in playing it - the fact that each game is framed as a tale being told that the players are then using their dice to influence.

Beyond the dice system, both the hero creation system and the combat system are equally neat - mostly because of how refreshing and different they are.

Hero creation consists of four decisions:

  • Which of the gods has marked your hero
  • The gear your hero is carrying
  • Your hero’s defenses
  • A name and identity for your heroes

At first look, this is pretty standard stuff. Heroes can choose from five different gods, each with their own boons that they offer the players. It’s the gear and defense options that make the hero creation really shine. All of the gear is evocatively described, and the way it interacts with the game world only serves to draw the player in. Heroes begin with two defenses - descriptive items that might refer to concrete belongings or a character’s own natural talents.

Defenses also tie into the combat system - when your character loses all of their Defenses, they are Wounded, which has negative effects both in and out of combat.

Combat is played out in a series of Stanzas, repeating turn sequences that alternate between the heroes, their allies and their enemies. From the first character’s turn, battle follows this procedure:

  • After a Hero turn, if the Act they took was successful play goes to an Enemy.
  • If the Hero’s Act was a failure (or if they do not act), play moves to an ally of their choice.
  • An Enemy turn always passes to a Hero (except in the case of certain types of enemies)
  • Once every combatant has had a Turn, that completes a Stanza, and characters who have acted can be chosen to go next again.

This whole sequence feels a lot more evocative to me than the bog-standard “roll initiative and act in initiative order” that most other RPGs follow. Having the combat sequence bounce around between players every turns makes combat feel a little more real than just going down a list.

All in all, FEIGR introduces a lot of new concepts that I’m excited to playtest in the coming weeks. If you’re looking for an RPG that rocks the boat, definitely give FEIGR a try.

Cover image for A Beginner's Guide To Slowfunding

So you’ve written your first game and decided on a price for it. Now it’s time to get funding. But how? Especially as someone doing game design on an as-time-allows basis, generating funding can be hard - the usual business model, Kickstarter, requires a month-plus of dedicated time that some people just don’t have.

Enter slowfunding.

What Is Slowfunding?

Slowfunding is an alternative model where you gradually collect pre-orders for your game either until you reach some quantity of orders, or until you reach some quantity of funding. There are no stretch goals or early bird rewards - just a goal that has to be reached and, when it’s reached, orders get fulfilled.

DEMIGOD slowfunding progress bar showing $500 goal

So, in the example above, DEMIGOD has a $500 slowfunding goal. Once that goal is reached, I’ll send out for print copies. But print copies don’t have to be the only goal when it comes to slowfunding - Monkey’s Paw Games is using slowfunding for the ashcan edition of Fiends and Fortunes: in their specific case, they’re using it to fund the interior art.

Why Slowfunding?

Slowfunding is a less stressful and more flexible way of crowdfunding projects. Instead of having to rush for funding in 30 days, you have the flexibility of not having a hard deadline. There’s less of a risk of complete failure and a greater chance of your project being finalized - and all of this on a timeline that’s much more friendly to you, the creator.

How Do I Slowfund?

Okay, so you’ve decided you want to slowfund. How do you actually set that up?

First, decide on your slowfunding goal, just like you’d decide on the funding goal for a normal Kickstarter. Usually, you’d want to tie this to something tangible, like interior art or print copies. I decided on $500 for the DEMIGOD slowfund because it was how much I needed to do a print run, for example.

Once you’ve decided on your slowfunding goal, decide on how you’re selling your games. If you’re using Cardboard Monster, everything is already set up for you - Cardboard Monster’s default model is slowfunding.

If you want to slowfund via Itch, it’s a little different. Slowfunding via Itch is just a sale with a goal. Itch also allows you to set tiers like a standard Kickstarter - these are really just rewards that unlock at different price points.

After you’ve decided on your method of slowfunding, treat it just like you would any other crowdfunding effort - just on a longer timeline.

Hopefully this has opened your eyes to the world of slowfunding! If you have any questions around the process, feel free to reach out to me at chris@no-name-games.com.

Cover image for Demigod Returns From Kickstarter!

As of last week, DEMIGOD is officially out of Kickstarter. Unfortunately, it didn’t meet its crowdfunding goal. While it always sucks when this happens, never fear: I have a cunning plan.

If you take a look at the DEMIGOD Itch page, you’ll notice that DEMIGOD is now set up to slowfund. I talked about this a little in the post from two weeks ago. So what’s changed from then to now?

Well, I’ll no longer be slowfunding via Cardboard Monster. I didn’t know that Itch allowed you to offer physical goods when it came to setting up their reward tiers. Now that I know that that’s the case, I no longer need Cardboard Monster - everything will be handled by Itch.

That being the case, the reward tiers for Itch will mostly be carry-overs of the ones from Kickstarter. The “Mortal Acolyte” tier will go away, as will the larger tiers with the 3D printing files. Instead, the Itch tiers will be broken down like this:

  • Digital Demigod: Gets you a full-color PDF copy of the DEMIGOD rulebook. $15.
  • Seasoned Campaigner: Gets you a full-color PDF copy of the DEMIGOD rulebook, plus The Suitors For Lady Penelope add-on scenario. $18.
  • Scion Of Olympus: Gets you full color print and PDF copies of the DEMIGOD rulebook, plus The Suitors For Lady Penelope add-on scenario. $50 + shipping.
  • Patroned by Hermes: For merchants, retailers and others patroned by Hermes. Gets you four print copies of the DEMIGOD rulebook, as well as PDF support for any physical book sales you make going forward. $100 + shipping.

Each slowfund I set up will cap at $500 - enough for me to do a print run of the DEMIGOD core book to fulfill the orders placed during the slowfund. Once I reach that cap, the print order gets placed and the next slowfund begins.

If you have any questions about the slowfund tiers or the process as a whole, feel free to reach out to chris@no-name-games.com with your Qs.

Cover image for Thirty Pieces Of Silver

So you’ve poured sweat, tears and (hopefully not) blood into the creation of a new TTRPG or wargame. You’ve got some folks on the internet interested in buying a copy - and maybe even a few physical stores, too. It’s time to put a price on the thing. But how do you actually do that without selling it for too much (or too little)?

  1. Itemize your costs.

Spreadsheet showing itemized game development expenses

Before you do anything else, figure out how much it cost you to get this book made. Make sure you keep track of as many dollars as possible. Art? Keep a note. Editing? Keep a note. Layout? Keep a note. This will tell you just how much money you need to “pay yourself back” in order to start turning a profit on your game. So, for example, I spent $2338 bringing DEMIGOD to life - a combination of illustrations, editing fees and general business costs. Before I can start turning a profit on DEMIGOD, I need to make back that $2338. Additionally, those costs can be divided into what I call “spin up” costs and “keep the lights on” costs. Your spin up costs are all of the costs you incur to bring your product to market, while your keep-the-lights-on costs are just that - the costs of doing business and keeping the lights on. Keep-the-lights-on costs would be things like website or email hosting costs, printing costs, convention costs, etc.

  1. Determine your cost-per-item.

Once you’ve figured out what your costs are to bring your game to market, you need to figure out your cost-per-item. The best way to do this is to take your total costs and divide it by your wholesale stock. So if you have $2338 in costs and 100 units of your game in stock, your cost-per-item is $23.38. You will need to sell your game for at least $24.00 (rounded up for convenience) in order to break even on your costs.

  1. Do proper market research.

Collection of tabletop game rulebooks for market research

Now that you have your cost-per-item, it’s time to do some market research. Look up what games like yours are selling for. No, that doesn’t mean “demand Player’s Handbook prices just because you’re also selling a fantasy RPG a la D&D”. Instead, look to the smaller market players - something like Castles and Crusades (which retails for $19.99 as a PDF and $39.99 as a physical book) or Low Fantasy Gaming (which retails for $19.95 as a PDf and $44.95 as a physical softcover). Since I’m designing a wargame, I used the Osprey Games website (among others) to do my market research. Wargames of the kind I was designing retailed for about $35-40 for hard copies and around $20 for PDFs, giving me a good amount of wiggle room when it came to pricing my own game.

  1. Decide on both print and PDF prices.

Price comparison chart for print and PDF game formats

When it comes to pricing out your game, make sure you set separate prices for both print and PDF copies. While both formats have their associated costs, PDFs do not have the costs of printing and shipping, and so can typically be priced lower - usually 50% of the print retail price. This also means that you can price print copies to absorb the cost of their own printing and shipping, while PDFs are pure payback/profit.

  1. Set a Suggested Retail Price (SRP).

When businesses express interest in stocking your game, sometimes they’ll ask for a Suggested Retail Price (SRP) - that is, how much they should charge for the book when someone comes to their store to buy it. Your SRP is your cost-per-item plus your profit margine (which is itself a percentage of your cost). Or, expressed as a formula:

SRP = Cost + Profit Margin

You want to give any retailer who stocks your game at least a quarter of the cost as profit margin (including yourself!), if the market will bear it. So if DEMIGOD costs me $24.00 to produce, then 25% of 24 ($6.00) is my profit margin, leading to a total minimum SRP of $30.00 - for print copies, at least. Since PDFs are usually priced at 50% of the retail price, the PDF price for this example copy of DEMIGOD would end up being $15.00.

Pricing your game can seem overwhelming, but this should give you a general ballpark and provide some insight into how things work “behind the scenes”. If this sort of thing piques your interest or you have any other tips on pricing games, let me know via email at chris@no-name-games.com.

Cover image for Exciting New Developments

So The Blog With No Name (and No Name Games as a whole) have been on a bit of a hiatus for a couple reasons. First was that I started a Kickstarter for DEMIGOD, No Name Games’s first solo-published game. When it looked like that Kickstarter wasn’t going to fund, I turned to setting up other ways for getting the game funded and “paying myself back”. So far, I’ve arrived at three solutions:

  1. Slowfunding via Itch.
  2. Slowfunding via Cardboard Monster.
  3. Some combination of the above.

As it stands, I’m looking mostly at #3. Itch would handle the distribution of PDF/digital versions of my games and their associated 3D printing files, while Cardboard Monster would handle physical distribution. So here’s how things will break down:

  • If you want a PDF copy of DEMIGOD and/or the 3D print files, those will be available from Itch for $15 (PDF) or $10 apiece for the 3D printing files.
  • If you want a print copy, you’ll have two options: order straight from me for $30; or order from Cardboard Monster for $30.

Speaking of physical copies, that leads to my second point: as of the end of next month, I’ll have physical copies of DEMIGOD in Nowhere’s Store of Forgotten Lore in Springfield, MO. So if you’re in the Springfield area, definitely check it out!

Nowhere's Store of Forgotten Lore storefront

The third thing doesn’t really have to do with the first two, but I also redesigned the No Name Games website! I got rid of the big central logo in place of something a little more understated. The click effect is also gone on the logo. Makes the site a little longer, but now everything should load faster - especially because the site and blog are now rolled into one.

I’ll be back next week with our regularly scheduled programming - a post on how to price your TTRPGs.

Cover image for What I Learned From My First Con

Last Sunday, I went to my first-ever con as a vendor. Overall, I had a really good time, played some cool games, and even managed to get in some outreach about DEMIGOD while I was there. I also learned several things that will hopefully make my next vendor appearance even more successful than this one.

  1. Do adequate research about the con you’re going to.

The con I went to on Sunday was called Harrisburg Board Game Day - emphasis mine. As someone trying to promote a miniatures wargame, I was definitely in the minority. There were some people demoing Warhammer 40,000 and Battletech, but the vast majority of people were demoing or playing actual, in-box board games. If I’d known that, I would have printed up and brought some copies of “Wands & Laserguns” - a rules-lite, component-lite TTRPG that Justin Vandermeer and I created that probably would have been more of a hit than the relatively component-heavy DEMIGOD.

Additionally, do some research on the convention space itself. Will it have free-standing 6x4 tables? Booths? What will the lighting look like where your booth is? Can you get to it easily? Can you get supplies to it easily? All of these questions are important when it comes time to setting up for your first con.

  1. Make sure you’re put with people who have the same goals you do.

When I showed up to the convention hall, I was told that all of the playtesters were on the second floor. Which was fine, except that all the game demos (Warhammer 40,000/Battletech/etc) were happening on the first floor. The second floor, as it turned out, had spaces where people could demo games that they’d brought, but the vast majority of the space ended up being used by people renting games. It very much felt like the game designers were relegated to an afterthought - even when people got to the second floor, the first thing they saw was the giant booth full of rentable games, not so much the group of designers there to get people playing games they’d brought.

  1. Make sure your game components are durable enough for a full day of gaming.

While this might go without saying, make sure that the components you bring with you can stand up to a full day of handling - not just by you, but by the general public, as well. While you and any friends you invite to playtest your designs might have the utmost respect for your components, the general public may not - and not even on purpose. I had the spears of two of the miniatures I brought with me snap off throughout the day I was at the convention, just from handling throughout the day. So making sure your components last the day is really important.

  1. Bring adequate amounts of advertising

One of the biggest things that will bring people to your table is bright, eye-catching advertising. If you look at my table (below), you’ll notice that the only real advertising I have is the NNG tablecloth and some business cards.

My vendor table setup at the convention

Because of the way the table is set up, you can’t really see the tablecloth - something like a standing banner or table banner would do much better to attract people’s attention by virtue of being seen from out in the aisle.

What tips do you have for people vending at their first con?

Cover image for Battle of the Hot Gates

Introduction

The year is 480 B.C.E. The place, Thermopylae. Across the narrow pass stands the thousands-strong Persian army, ready to bring Greece to her knees. With you stand seven thousand Lacedaemonians, Mantineans, Tegeans, Thespians, Phocians, Locrians and others - Greeks all, ready to stand against the menace invading their shores. News has also reached you that the main Spartan army is on its way: all you have to do is hold off the Persians as long as possible.

The Forces

The Greeks have 45 ranks of hoplite infantry. Six of those ranks are Spartans, and have the following special rule:

Spartan Courage: Spartans are not pushed back when they take casualties.

The Persians have 60 ranks of infantry and archers, including five ranks of Immortals, who have the following special rule:

Constant Strength: If the Immortals do not lose a full rank by the end of combat, replace the lost models at the back of the unit.

Setup

Play the game on a 6’ x 4’ board. Deploy the Greeks up to half the table’s width forward of their board edge, with a wall placed halfway into their deployment zone. Any units immediately behind the wall get +1 Push when being charged by units beyond the wall.

Deploy the Persians up to 12” forward of their board edge.

The game is played for six turns.

Victory Conditions

The Greeks score a major victory if there are still Greek units on the field and Leonidas is still alive by the end of the sixth turn.

The Greeks score a minor victory if there are still Greek units on the field by the end of the sixth turn.

The Persians score a victory if there are no Greek units left on the field by the end of the sixth turn.

If you’d like this scenario as a PDF, you can find it here.

Cover image for Scenario Creation In Miniature Wargames

When it comes to writing your own miniature wargame, scenario creation is one of those things that can’t be ignored. Good scenarios will draw players into the game (and maybe get the gears turning for writing their own missions/quests) while bad ones will leave your ruleset languishing on the bookshelf. So how do you write good scenarios?

Consider Your Game And Its Objective

Before you start writing your scenarios, consider the type of game you’re making. Some scenario or mission types might fit some games better than others. For example, an “Annihilate” scenario fits much better with a platoon-level skirmish game than it does with one where you’re a wizard tasked with finding and safeguarding ancient knowledge.

What makes a good wargame scenario?

Bolt Action miniatures wargame in play

Good scenarios, whether they’re for 10-model-per-side skirmish games or company-level WWII wargames, should:

  • Be interesting. If the scenario doesn’t interest you, why are you looking at it?
  • Offer a challenge to everyone playing, whether that’s through unequal forces, different objectives, or some other factor.
  • Offer a number of different, conflicting choices that players must make in order to win. The winning move should not be obvious each time.
  • Have clear win conditions.
  • Have different win conditions for each player. While “Annihilate” might be fun the first time through, by the fourth or fifth, it gets boring if that’s the only win condition for both sides.
  • Be thoroughly tested.

In order to showcase these concepts, we’ll take a look at them through the lens of my favorite WWII battles, the assault on Brecourt Manor.

Piquing player interest

So how do we get players interested? The best way is to give them context - why are they fighting this particular scenario? Are they Dick Winters at Brecourt Manor? Leonidas at the Hot Gates? Having this sort of context makes for a much more thrilling scenario than “first to five Victory Points wins”.

Here’s an example:

June 6, 1944.

Le Grand Chemin, France.

It is the morning of D-Day. After a hellish drop that left E Company scattered all along the Cotentin Peninsula and multiple engagements through the pre-dawn hours, you have finally managed to link up with battalion HQ at the hamlet of Le Grand Chemin. By morning, only 23 men from Company E have assembled. Regardless, there’s work to be done - orders have come down from Captain Hester: “There’s fire along that hedgerow there. Take care of it.”

This little bit of fluff tells players who they are (Dick Winters/Company E) and what they’re doing - more than enough to get a game going.

Keeping things challenging

It’s not enough for a scenario to have good fluff - it needs to be challenging for all of the players involved. The challenge can be scalable - introductory scenarios need to be relatively uncomplicated to familiarize players with the rules - but the outcome needs to not be a given every time.

An important part of making things challenging is that every challenge the players face needs to be one they can surmount. If a player needs to get across to the other side of the board in six turns, the board needs to be small enough that the slowest of his units can cross it in six turns.

Challenges for your players can be symmetric (offering equal risk and opportunity to all sides) like two similar armies facing off against each other on an open field: alternatively, obstacles may be asymmetic - fewer troops vs more, more experienced troops vs conscripts, etc.

Brecourt Manor offers a good example: Winters had 22 other paratroopers with him, compared to the 60-or-so Germans manning the artillery battery - about a 3:1 numerical disadvantage. The Germans also had double the number of machine guns (4 to Winters’ 2) which the Americans negated using the element of surprise - something you can simulate by giving the American player the first turn.

The choice of choices

Map diagram of the Brecourt Manor assault

All scenarios should present your players with obstacles, and each obstacle should present players with a choice - preferably with more than two options. This gives your games an element of unpredictability. Will your men deploy in the trees to the north, or will they attempt to creep along the southern hedgerows and take the MG crews by surprise?

Never give your players just one way to solve a problem - single-solution problems never make for interesting games. Conversely, don’t make the solution to a problem something that’s totally dependent on chance (such as reinforcements arriving on a roll of 6, which might never happen).

When it comes to designing routes to reach an objective (and counters to those routes), not all of them need to be promising - they just have to all be possible under the right circumstances.

Different paths to victory

When it comes to writing good victory conditions, make sure you do the following:

  • Describe exactly what must be done to be considered the winner.
  • Provide different win conditions for each side.

Using our Brecourt Manor scenario as an example, the Americans might have the following victory conditions:

  • Major Victory: Destroy all four guns and return with the German map.
  • Minor Victory: Destroy at least 2 of the guns and return with the German map.

Conversely, the Germans might have these victory conditions:

  • Major Victory: Inflict at least 50 percent casualties on the American forces and have at least 3 guns intact at the end of the game.
  • Minor Victory: Inflict at least 25 percent casualties on the American forces and have at least 2 guns intact at the end of the game.

Giving both sides different victory conditions, as well as providing conditions for both major and minor victories, makes sure that no game is exactly the same - and that players have a reason to keep fighting on once things start going south.

Testing till it breaks

Once you have your scenario all written up, it’s time to test it. The best players to test these sorts of scenarios are malignant ones - people who want to take advantage of any and every loophole in the scenario and exploit it so that they can win. Make sure you run through the scenario at least 2-3 times so that you can iron out the defects. You’ll know you have a good scenario when, despite every attempt of your players to break it, it still turns out as a good game for both sides.

Cover image for Handling Morale In Miniature Wargames

When it comes to miniature wargames rulesets, morale rules are one of those things that are conspicuous when they’re either absent or done badly. What is “morale”, though? And how do you write good morale rules?

What Is Morale?

Morale is usually defined as “the confidence, enthusiasm, and discipline of a person or group at a particular time”, or something similar. So how does that translate to tabletop wargames? Typically, “morale” is represented by some statistic (Leadership, Motivation, Resolve, Will or similar) that is then tested against at pre-determined intervals (when a unit takes X number of casualties, if a unit leader is killed, etc). If the unit passes the morale check, it stays put. If not, bad things usually start happening, ranging from the worsened combat effectiveness all the way to outright routing.

Morale As A Finite Resource

While morale is typically treated as something that functions as a pass-fail (units are OK until they aren’t), there is evidence that morale is much more finite than that. A group of researchers from the Florida State, Florida Atlantic, and San Diego State universities studied the concept of “ego depletion” - that is, that willpower is a finite resource. What they found was this:

Saying no to every naughty impulse, from raiding the refrigerator to skipping class, requires a little bit of willpower fuel, and once you spend that fuel it becomes harder to say no the next time. … As your ego depletes, your automatic processes get louder, and each successive attempt to take control of your impulses is less successful than the last.

So how does this apply to morale? The things that discipline guards against - turning tail and running, or hiding in your trench till the shooting stops - are some of the “naughty impulses” that the quote above talks about. They’re things that any unit of soldiers has to take a conscious action not to do. However, that conscious action gets easier and easier the more training/discipline a unit of soldiers has to fall back on: a unit of untrained conscripts is much more likely to rout when faced with oncoming fire than a group of hardened veterans.

Morale As A Determining Factor

French infantry detained before German fences during World War I

When it comes to winning a battle, morale carries much more weight than anything else - it’s much easier to make someone run than it is to kill them outright. So how does that translate to writing wargaming rules? Well, it means that, from jump, units will seldom fight “to the last man” - there will be some point long before that where they surrender or flee. It’s one of the reasons why I never liked the “Last Man Standing” rules in Warhammer 40,000 - that “last man” is far more likely to turn tail and book it than he is to stay on the battlefield.

Okay, so we’ve gotten rid of “Last Man Standing” and its ilk - now what? Decide when and how the units in your game will break and retreat. The tried-and-true “wargaming break test” is 50% - that is, a unit will only start testing for morale once it’s received 50% (or more) casualties. History, hower, tells us that that’s not the case, that units (and armies above them) break long before they reach 50% casualties - for example, the French at Agincourt retreated after losing 6,000 of their 15,000 men (about 40%). At Crecy, the French only lost 20% (4,000 out of about 20,000) before they retreated.

You can still use 50% as a break metric - it’s a standard for a reason - but it’s much less realistic and makes it that much harder to use morale as a gameplay element unless all of the armies in the setting have crappy morale to begin with.

What to do instead? There are a couple of options: either have morale checks happen (with appropriate modifiers) every time a unit takes casualties, or make morale a function of weight of fire. What do I mean by that? Some games, such as One Page Rules’s Covering Fire and Crossfire before it, determine a unit’s ability to function based on the amount of fire it receives from the enemy.

Example shooting rules from a wargame rulebook

Both of the options I suggested turn morale from a pass-fail mechanic into something that’s much more gradual. Units accumulate stress until finally they break. This, I think, better represents how morale actually functions on a battlefield - a spending of willpower fuel that increases or decreases based on accumulated stressors.

A Question Of Leadership

So how do you handle Leadership in a graduated system like this? You have a couple options, depending on the scale of the game you’re writing. If you’re running something smaller scale (platoon level or below), you can give your sergeants/leaders different morale values and have squads use those for their tests as long as the leader is still alive. At company level (or larger), have command units give infantry/vehicle units a +1/+2 to their morale checks (depending on the type of command unit, of course).

Final Thoughts

Hopefully this shines a bit of a spotlight on morale mechanics and how they can be more than just pass-fail single-dice-roll tests. I’m not advocating a “best method” for morale tests - just that, if you’re writing morale rules, there’s other ways to do it than what’s been the “bog standard” of gaming for years.

Cover image for A Quick Guide To Getting Into Miniature Wargaming

Want to get into wargaming, but have no idea where to start? The explosion of the hobby in the 2000s has led to the creation of a dizzying number of new miniatures creators and new games to go with them. So where’s an interested player to start?

Find A Game Store Near You

Wandering into the friendly local game store (FLGS) or comic shop is often most people’s first encounter with miniatures wargaming. Punching in a Google search for “tabletop gaming stores near me” will give you a good list. Retailers such as Games Workshop and Warlord Games usually have store locators that you can search, too - popping down to one of the stores on the list is a great way to get introduced to the hobby.

Players gathered around a table playing a Warhammer game

What If You Can’t Find An FLGS?

While wargaming started as a two-player (or more) hobby, more and more companies are releasing games or supplements that cater to the solo wargamer. Osprey Games released Rangers of Shadow Deep in 2018, a dark fantasy-inspired solo game set in a fantasy world created by Joseph McCullough. McCullough’s fantasy skirmish game Frostgrave also has an expansion, Perilous Dark, that focuses on solo play. Other games and supplements include Kontraband for Patrick Todoroff’s Zona Alfa, Five Leagues From The Borderlands (and the sci-fi version Five Parsecs From Home), Perilous Tales, Fallout: Wasteland Warfare, Skyrim: Call To Arms.

I’ve also released my own solo wargame, a Greek-mythology-inspired skirmish game called Demigod.

Pick Miniatures That You Like

Once you’ve found a place to play, the next step is to find miniatures that you actually want to play with. There are miniatures out there for nearly every period of history - from the truly ancient to more modern wars and even the far-flung future. Finding miniatures that you like is a great way to keep yourself in the hobby - after all, miniature wargaming grew out of the hobby of collecting model soldiers.

Collection of painted miniature soldiers

Already Have Miniatures? No Problem

More and more, miniatures wargaming is moving toward the concept of “miniature agnosticism” - that is, the fact that you don’t need to use a company’s boutique miniatures to play their games. And some companies are taking it even further than that - releasing just the games themselves and expecting players to supply the miniatures. Examples include Crossfire (platoon-level WW2 gaming), as well as every single ruleset One Page Rules has put out.

Play The Games You Want To Play

Once you’ve got miniatures and a place to play, decide on what game you want to play. Rules exist for almost any setting and scenario you can think of, from ancient warfare to fantasy skirmishes. Want to replay Caesar’s conquests in Gaul? Check out Warlord Games’ Hail Caesar. Refight the American Revolution with Black Powder. For fantasy systems, pick between Warlords of Erewhon, Kings of War, Oathmark and more. In terms of sci-fi, the big boy on the block is Warhammer 40,000, but others exist too - including Mantic Games’ Warpath.

The most important tip I have for you, though, is this: get out there and play! Even if you don’t own exactly the right miniatures or they aren’t painted in exactly the right colors, what matters is that you’re out there and playing. Miniature wargaming - whether solo or against an opponent - is a great way to explore your interests and meet new people, to boot! So get out there and play on!

Cover image for A Brief History of Miniature Wargames

The First Miniature Wargame (UK, 1913)

Cover of Little Wars by H.G. Wells

Developed by the English writer H.G. Wells, Little Wars was the first book published on miniature wargaming. Unlike modern wargames, Little Wars was designed for a much larger playing field - like an entire living room floor. Infantry moved a foot (measured by a piece of string), while cavalry moved two. When units engaged in combat, they suffered a predetermined amount of losses based on how large they were.

Despite being designed for ease of play and accessibility, Wells’ rulebook failed to invigorate the miniatures wargaming community for a number of reasons: the rationing of tin and lead during the first World War made model soldiers expensive; there was also a dearth of clubs or magazines or even players of miniature wargames, which were still seen as a niche within the larger hobby of collecting toy soldiers.

The First Miniatures (US, 1955)

Wargaming miniatures as we know them today owe their start to John Edwin “Jack” Scruby, who began casting them out of type metal and selling them in his central California shop. Each miniature cost 15 cents, or about $1.68 in 2023 US dollars. By 1963, Scruby had switched from type metal to the 50/50 tin-lead alloy that would remain a wargaming staple well into the 1990s.

Jack Scruby miniatures

Scruby’s models are still being produced today by Historifigs, who offer both the 40mm and 54mm variants of Scruby’s designs.

In addition to his work with wargaming miniatures, Scruby ran the first US miniatures wargaming convention in 1956. The following year, he launched War Games Digest, a magazine devoted to gaming with military miniatures. WGD was published quarterly until 1963, at which point Scruby began publishing Table Top Talk, a sort of proto-White Dwarf (that is, a hobby magazine centered around selling his miniatures and miniature rulesets). One of the volumes of TTT can be read here.

Don Featherstone’s War Games Battles and Manoeuvres with Model Soldiers (UK, 1962)

More commonly known simply as War Games, Don Featherstone’s book on miniature wargaming (which included Tony Bath’s 1956 ancient wargaming ruleset) is considered both the first mainstream publication for miniature wargaming since Little Wars but also the father of what we would now consider modern wargaming.

Featherstone’s book (along with the emergence of several British miniature figure manufacturers such as Skytrex and Peter Laing) was responsible for a huge upswing in the popularity of the hobby throughout the 1960s and 1970s.

Chainmail (US, 1971)

Chainmail rulebook cover

Created by Gary Gygax, Chainmail drew its inspiration from both Tony Bath’s earlier medieval mass combat ruleset and also the rules designed by Jeff Perren, who used Henry Bodenstedt’s Siege of Bodenburg medieval combat rules as an inspiration.

Chainmail’s big contribution to miniature wargaming was its set of mass-combat rules. In Chainmail’s ruleset, each figure represented twenty men, and figures are divided into six basic types: light foot, heavy foot, armored foot, light horse, medium horse, and heavy horse. Depending on which unit was attacking which, players rolled a number of six-sided dice, with certain values denoting a kill. For example, when heavy horse is attacking light foot, the attacker is allowed to roll four dice per figure, with each five or six denoting a kill.

Chainmail also included a fantasy supplement, which included rules for spells, magic weapons, and heroic units - an early precursor to both first-edition Dungeons and Dragons and Warhammer Fantasy Battle.

Warhammer Fantasy Battle (UK, 1983)

Warhammer Fantasy Battle rulebook cover

Developed by Bryan Ansell, Richard Halliwell and Rick Priestley, Warhammer Fantasy Battle (WHFB) was a miniature wargame published by the Games Workshop company from 1983-2015. WHFB came into existence out of a desire to use otherwise-unused fantasy miniatures, and the first edition rulebook contained both mass-battle rules as well as general rules for roleplaying. By the third and fourth editions, in 1987 and 1992, the roleplaying rules had been mostly removed in favor of fantasy mass-battles.

Third edition also heavily-encouraged the use of standardized army lists, as opposed to the more open-ended army design of the first and second editions. By fourth edition, army lists were enforced in the form of Warhammer Army books for each of the game’s separate factions. Each book gave its faction a limited number of unit options: army list composition was further limited by the number of points that could be spent on troops, monsters, heroes and so on.

By sixth edition in 2000, WHFB had become the fantasy mass combat game that most people are now familiar with. The game would be sunset by Games Workshop in 2015 (on its eighth edition as of 2010) citing a decrease in sales.

Warhammer 40,000 (UK, 1987)

Perhaps the most popular miniature wargame in the world, Warhammer 40,000 began life as an offshoot of WHFB. Rick Priestley and his fellow designers had added a smattering of optional science fiction elements, namely in the form of advanced technological artefacts (e.g., laser weapons) left behind by a long-gone race of spacefarers, to the WHFB universe.

These science-fiction elements coalesced with another ruleset that Priestley had begun writing before he joined Games Workshop, a spaceship combat ruleset by the name of Rogue Trader. The lore of Priestley’s game remained in the first edition of Warhammer 40,000 (released as Warhammer 40,000: Rogue Trader due to concerns that it would be confused with a Rogue Trooper board game also produced by Games Workshop) but the spaceship rules were cut due to lack of space.

The initial Rogue Trader rules were more heavily oriented toward roleplaying vs traditional wargaming. It was not until the game’s second edition in 1993 that army lists were introduced, mirroring their introduction in WHFB a year earlier. Armies in Warhammer 40,000: Second Edition had to spend 75% of their points on units from the same faction. Up to 50% of an army’s points could be spent on a single hero, giving rise to the nickname of “Herohammer”. Players could choose from nine codexes/army books: Angels of Death, Chaos, Eldar, Imperial Guard, Orks, Sisters of Battle, Tyranids, Ultramarines and Space Wolves. The Angels of Death, Ultramarines and Space Wolves codexes each covered different army lists for the Space Marines faction.

The third edition of the rules streamlined them to allow for much larger battles. Armies in third edition continued the use of codexes. Four new army codexes were introduced toward the end of the edition: two new alien races (the Necrons and the Tau) and two armies of the Inquisition - the Witchhunters and the Daemonhunters (previously featured in the Sisters of Battle codex and other, supplementary material).

From sixth edition (2012) onward, the Warhammer 40,000 system was plagued with rules bloat, something that Games Workshop hopes to fix with the release of the game’s 10th edition in 2023.